How to Build a Yukon Portage Pack

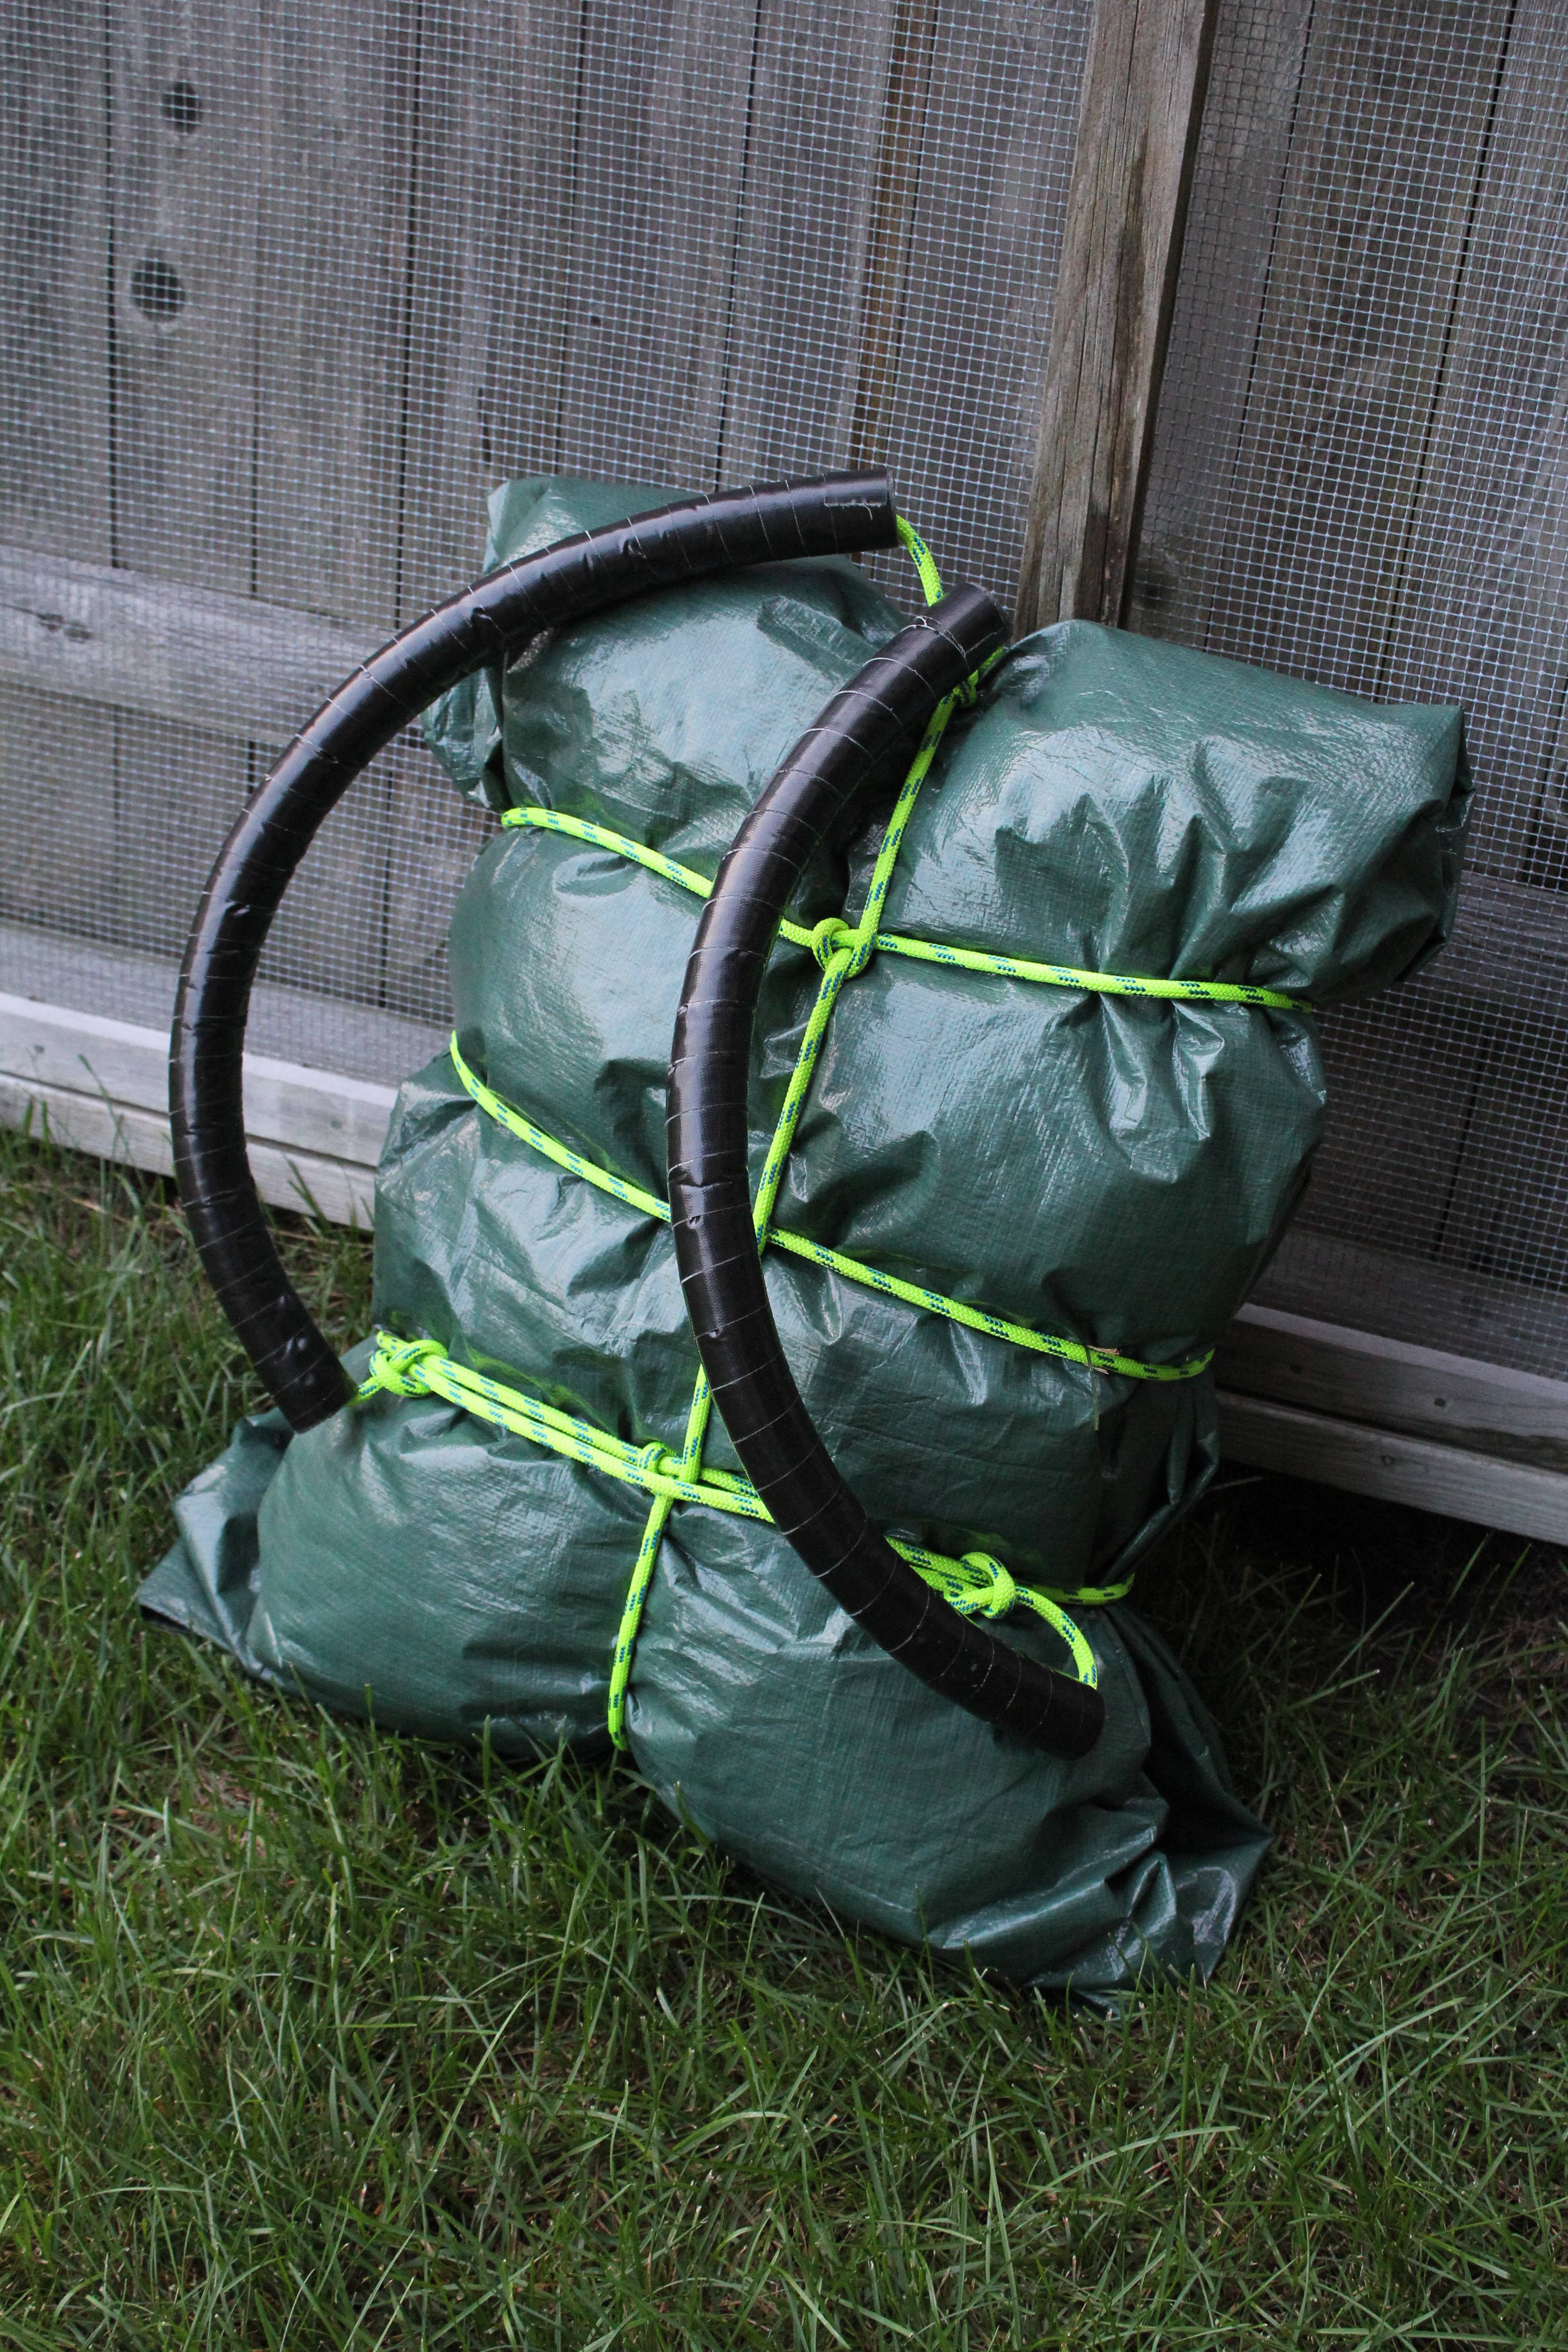
Aside from constructing a tarp tent there’s another (and arguably more clever) way that a tarp and 30ft length of rope can turn out to be quite useful to the kayak camper; for constructing a Yukon-style portage pack! The Yukon pack, also known as a Hudson Bay Company Pack, makes use of basic camping materials to fashion a make-shift back pack. These packs are particularly useful and practical for short-hauling gear from the landing to the campsite and effectively eliminate the need to carry a formal portage pack amongst your kayak camping gear.


A quick Google search will turn up many inventive ways to construct a Yukon pack. After messing around with a few different techniques I’ve come up with my own take:

Yukon Pack Materials:

  • 8×10 ft tarp or ground cloth (a larger tarp would work well too)
  • 30ft of rope or parachute cord (a towline is about this long)
  • Optional: 2x 18inch sections of pipe insulation wrapped with duct tape for shoulder straps.

Steps for Building a Yukon Pack:

Step 1: Organize and Pack Your Items

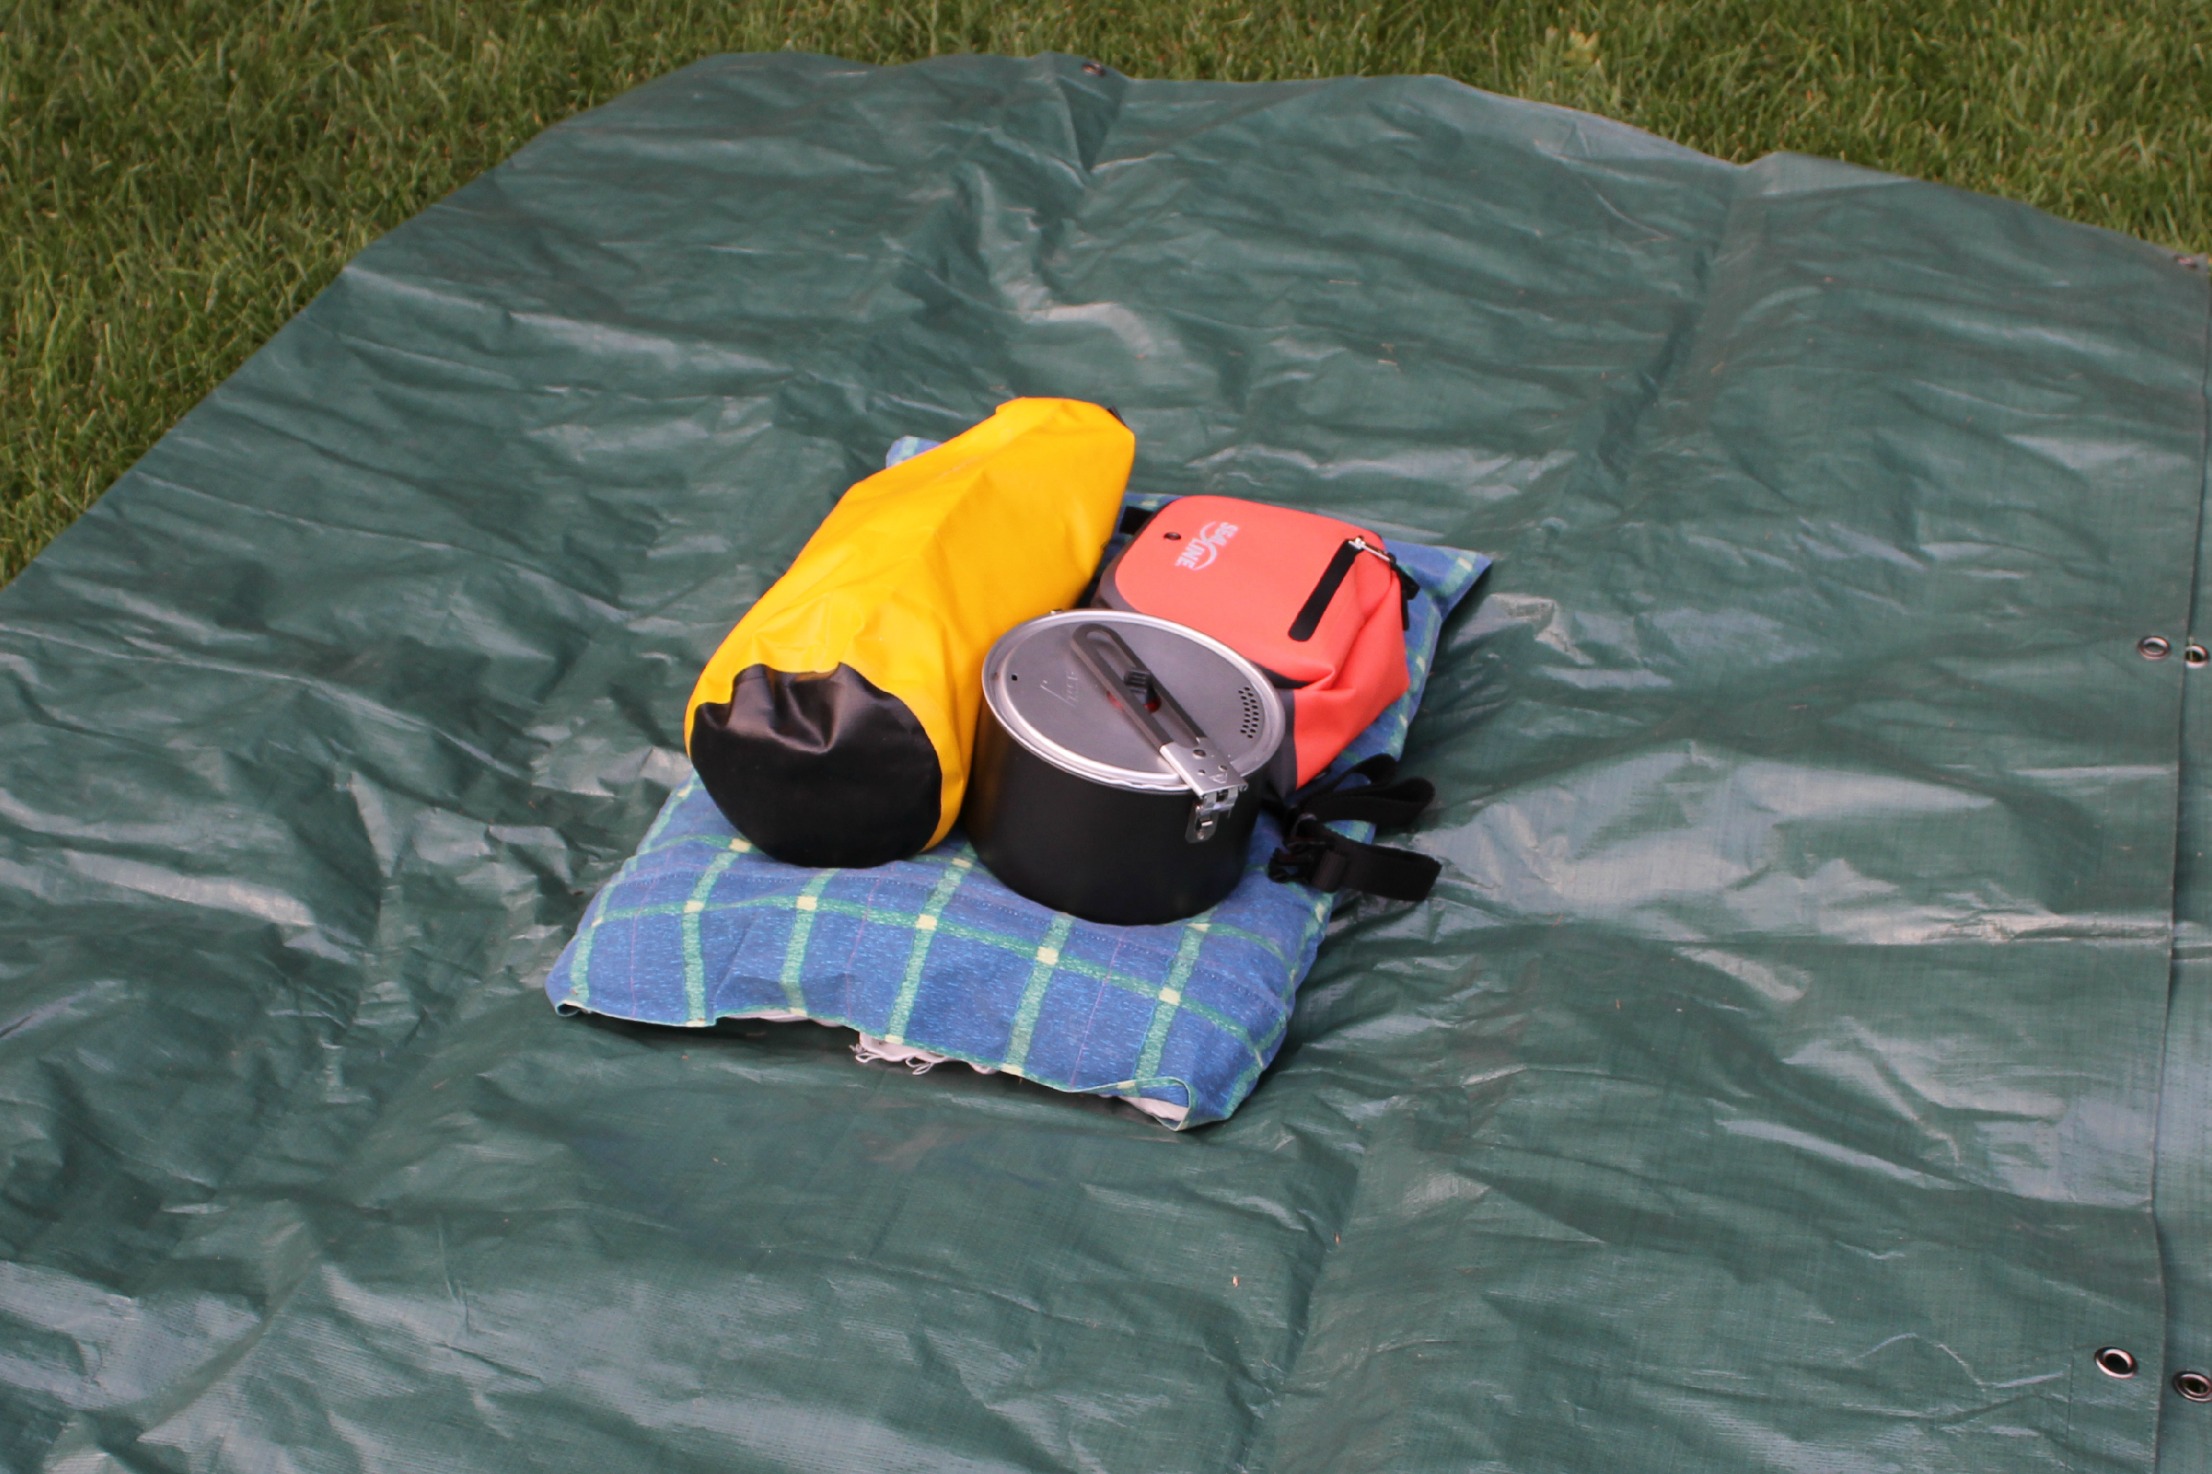
The comfort of the Yukon pack on your back has everything to do with how you organize your gear within the tarp. Start by laying the tarp flat on the ground and fold it in half. Then begin to pack your gear on top of the folded tarp. The gear should be concentrated near the center of the folded tarp such that the longest edge runs top to bottom.

The first layer to be packed should consist of the softest items of gear (sleeping bag, extra clothing, pillows, ect.) as these will act as padding against your back. Subsequent layers should be packed such that the heaviest items (pots and pans) are in the middle and that the weight is balanced from left to right. I’ve found that packing smaller items into dry bags can help to consolidate them within the Yukon pack.


Important note: Any items needed along the haul (water bottles, map, compass, ect.) should be left unpacked as it’s difficult to access items within the pack without fully disassembling it!

Step 2: Fold Your Yukon Pack

Once all of your items have been laid out on the tarp it’s time to wrap them up like a giant Pot Sticker! Fold the tarp up in the following order: left, right, bottom top. Make sure to fold the tarp tightly such that the gear doesn’t become loose and move around inside.

Step 3: Tie the Top Knot

The most complicated part of constructing a Yukon pack is tying the “top knot.” This knot is the key point of the wrap and will eventually support the arm straps. It took me a few tries to get this knot correct so I recommend practicing at home to save time and frustration in the backcountry!

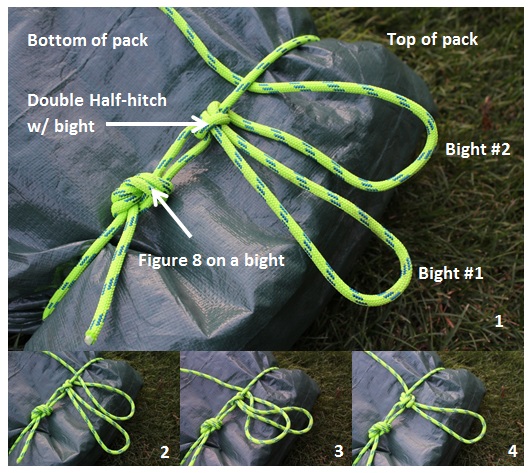
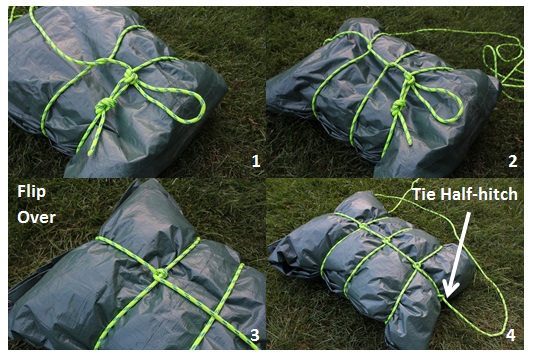
Start by tying a figure 8 on a bight into one end of the rope or parachute cord. Wrap the rope around the tarp, feed it through the bight, and cinch it down to tighten. Then secure this knot by tying a double half-hitch with a bight (Bight #1) as shown in the Panel 1 of the image below.

To create the rest of “top knot” pull a second bight (Bight #2) through to the right of Bight #1 as shown in Panel 1. Twist Bight #2 one half turn as shown in Panel 2. Slip Bight #1 through Bight #2 as shown in Panel 3. Complete the top knot by pulling Bight #2 tight. Confused??? That’s, OK…I was too the first dozen times! Following the pictures should get you there eventually J


Step 4: Wrap Your Yukon Pack

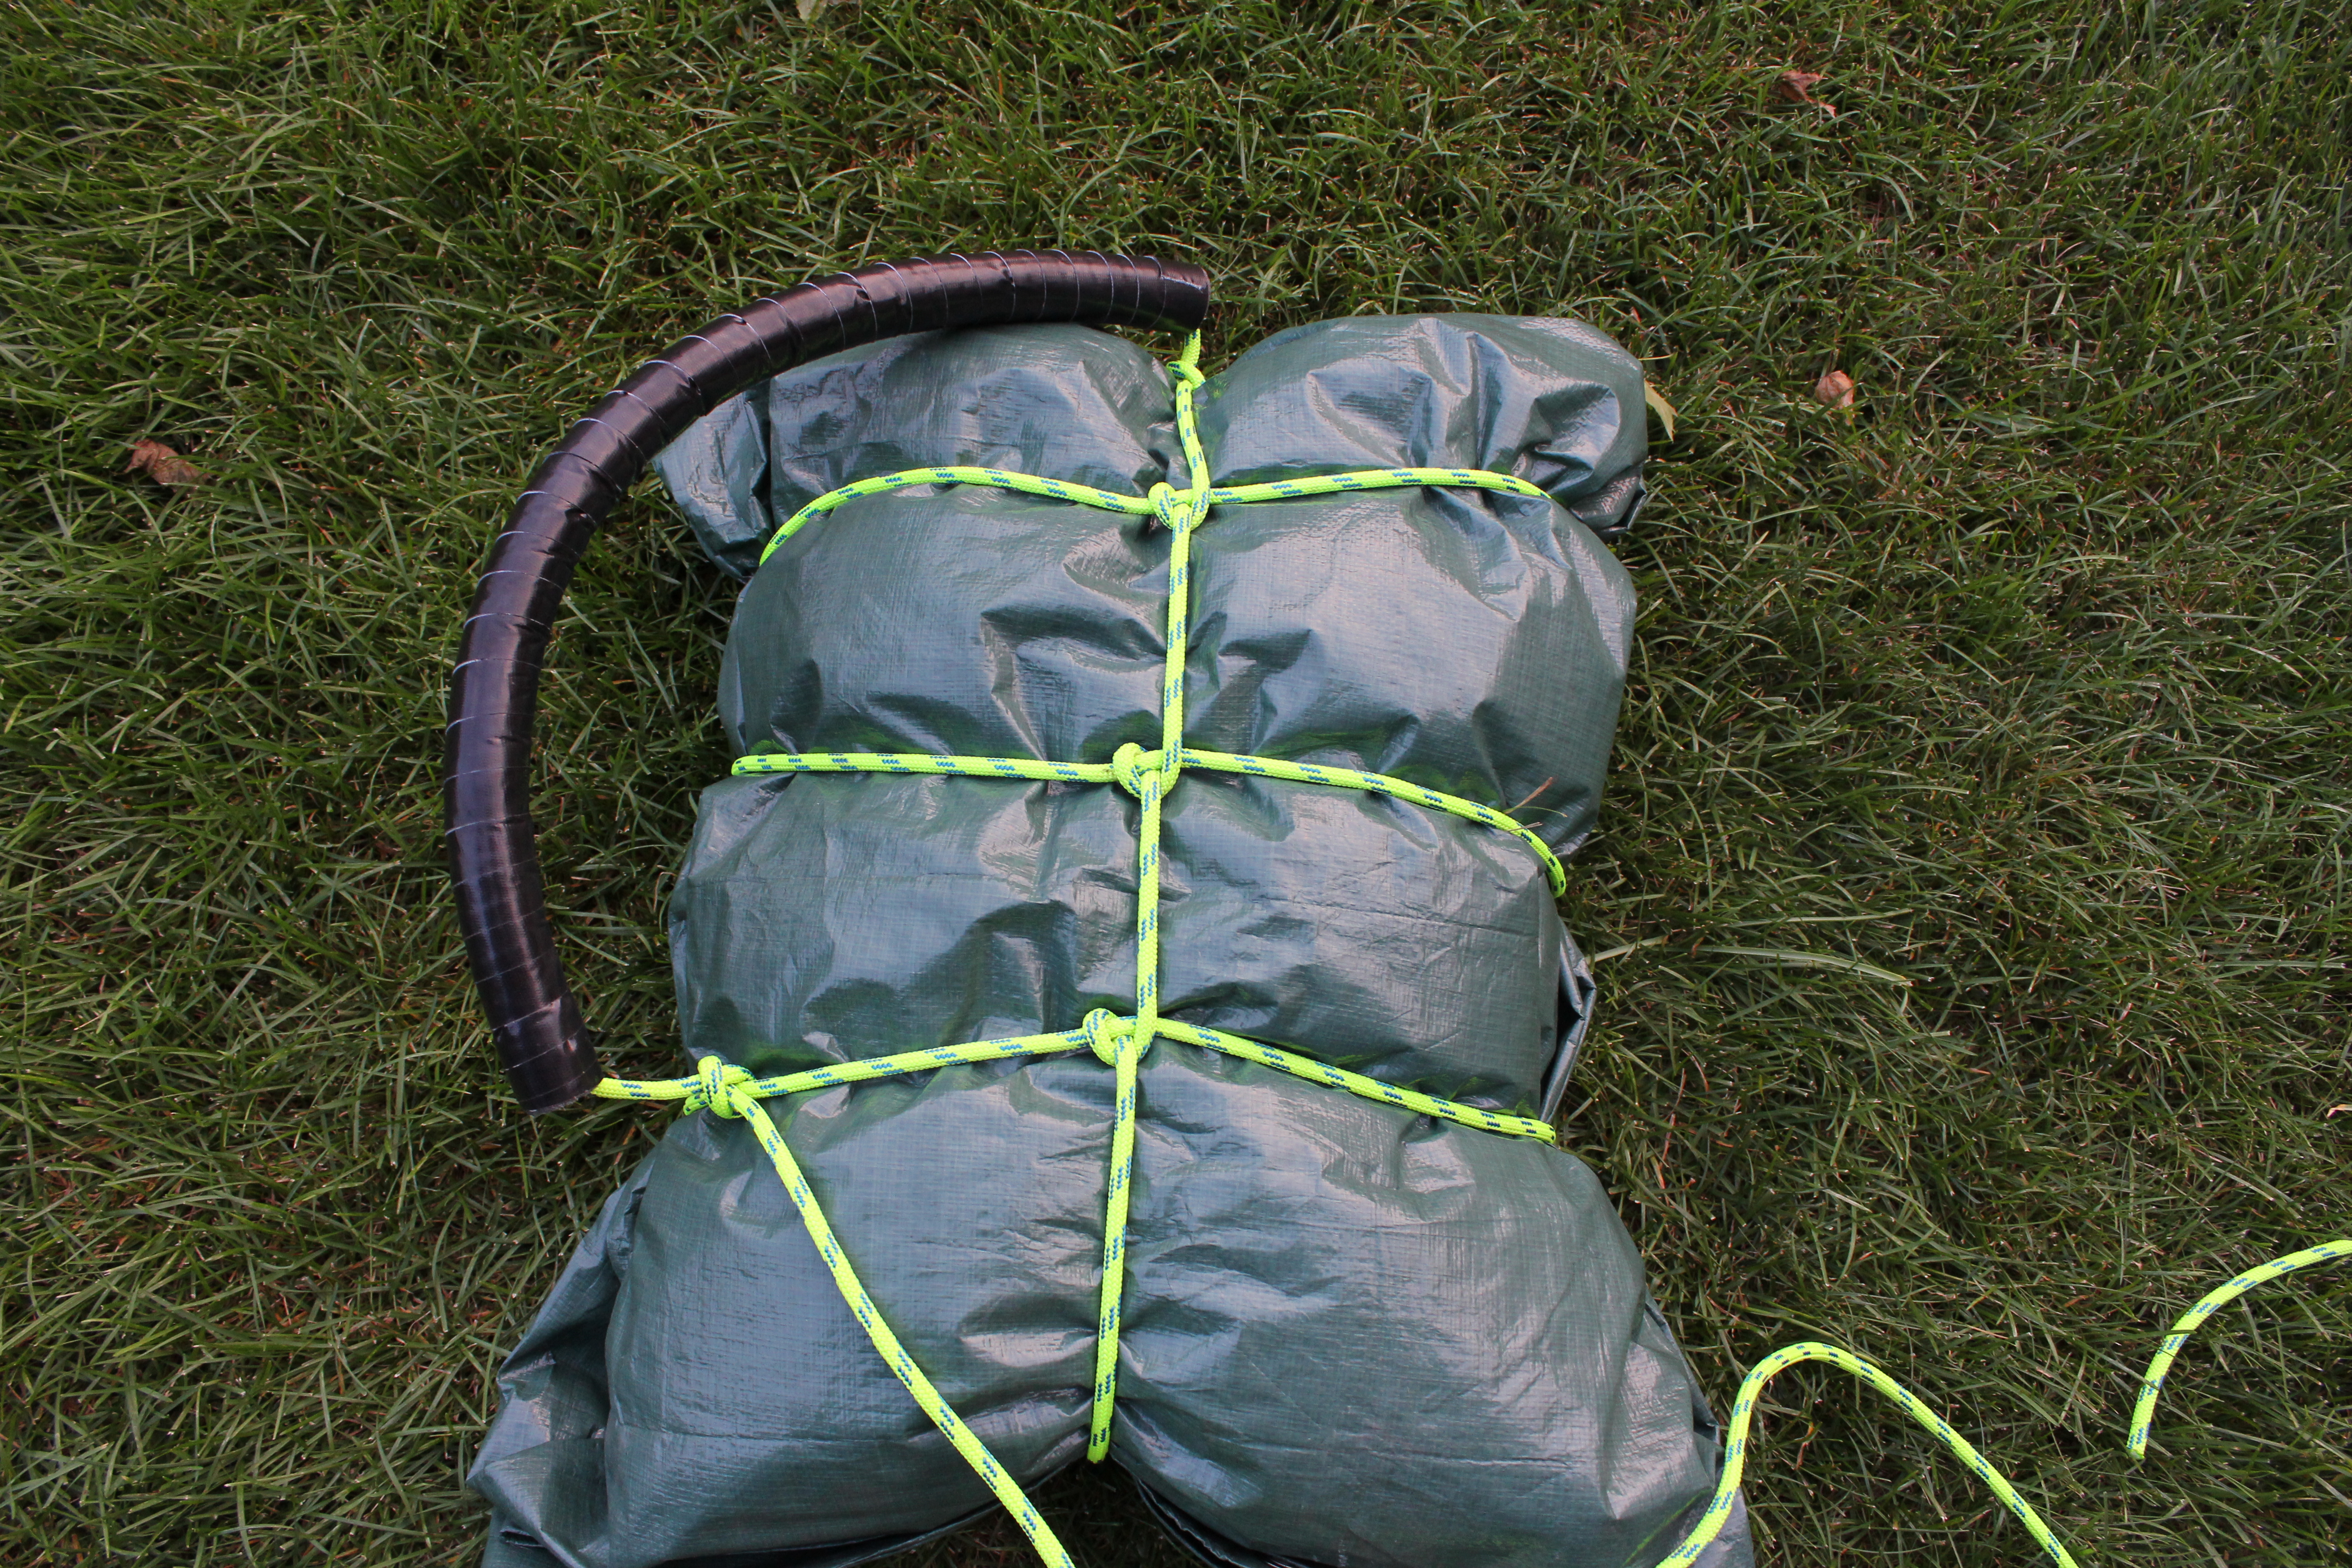
Once the top knot is complete you’re ready to wrap up your Yukon pack! Start on the outside part of the pack (the side that doesn’t touch your back). Wrap the rope tightly around the pack and back through the loop that this creates as shown in Panel 1 below. Repeat this step 3-4 times as shown in Panel 2. This should be enough wraps to secure the pack.

Next, flip the pack over to compete the wrap on the inside part of the pack (the side that touches your back). This can be done by weaving a knot into each of the horizontal wraps as shown in Panel 3. Once this is complete, simply pull the excess rope through the top knot and secure the wrap with half-hitch or two as shown in Panel 4.

Step 5: Attach/ Create the Shoulder Straps

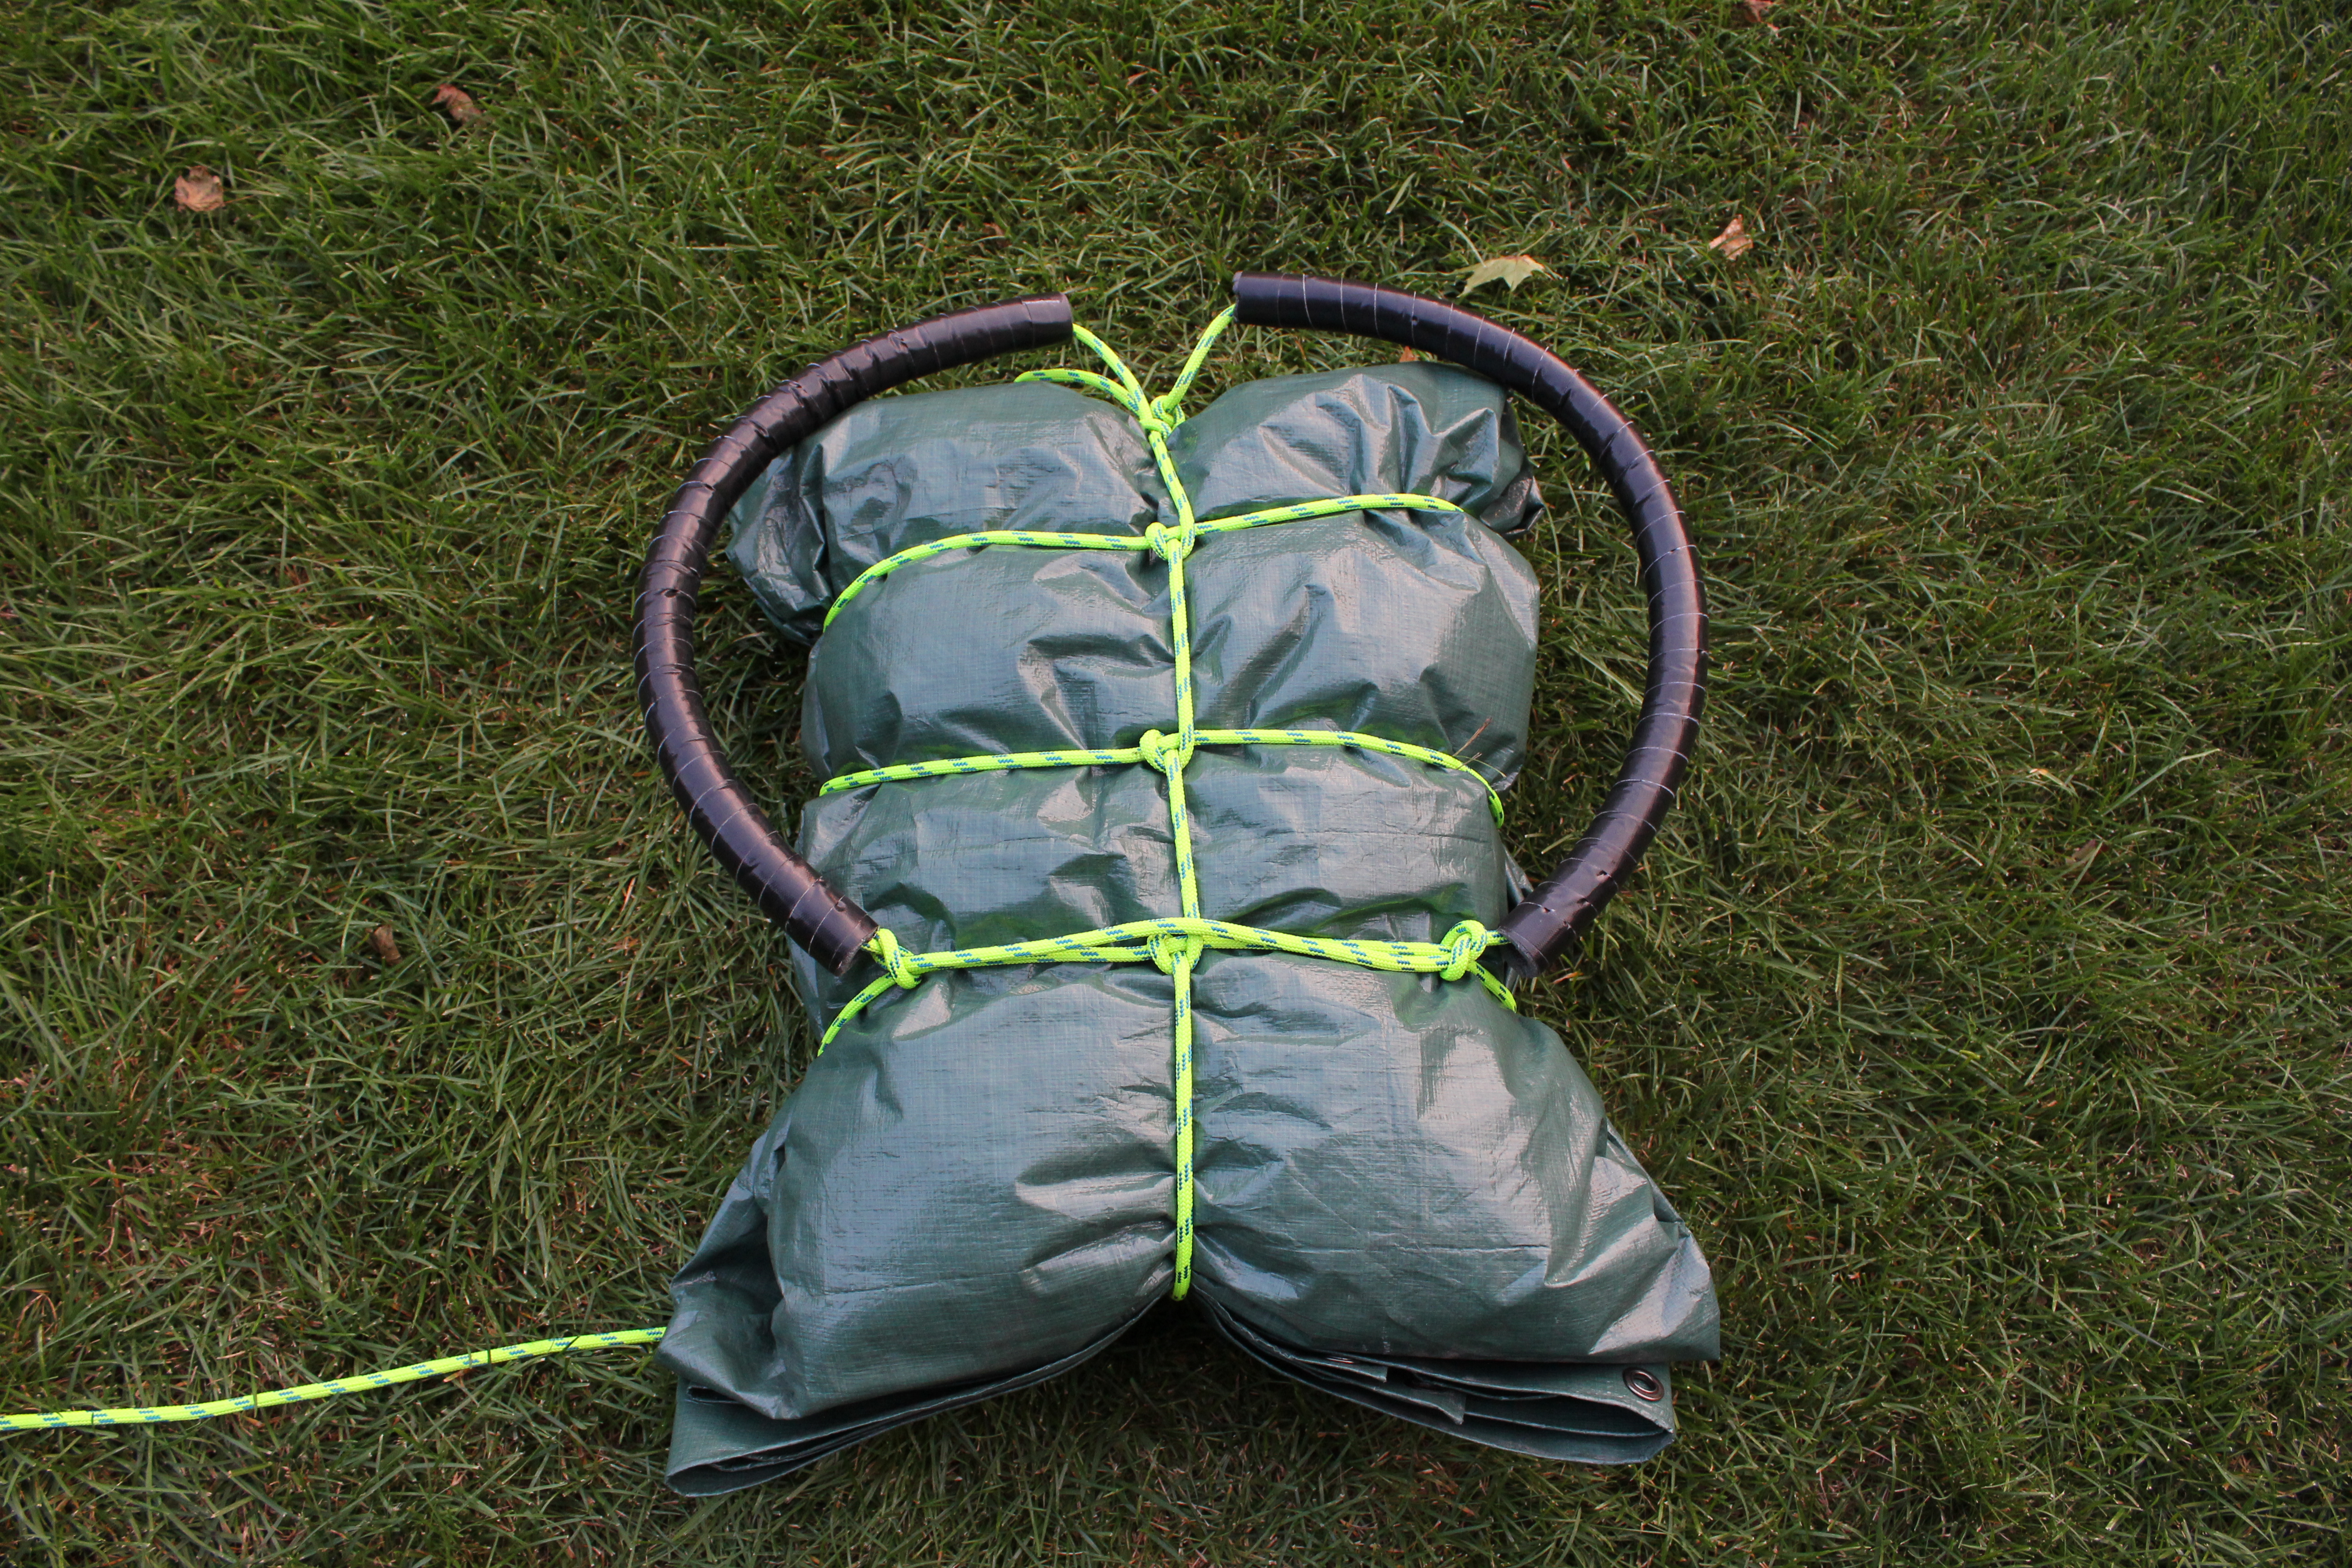
There are many ways to create straps for your Yukon pack. The easiest (and cheapest) way is to utilize the remaining length of rope from the wrap. I find that rope along really cuts into your shoulders especially when the pack is heavy or the haul is long. For this reason, I fashioned some cheap shoulder strap pads by wrapping two 18inch lengths of ½ inch pipe insulation in heavy-duty duct tape. I find that these home-made pads are comfortable, very light weight, and readily stowed in the kayak. Others have used old-belts or commercially available shoulder straps for a more comfortable carry.

To attach the shoulder straps simply thread the excess rope from the top-knot through the shoulder strap and secure to the lowest wrap with an overhand knot as shown in the image below. Run the rope along the lowest wrap to the opposite side of the pack and tie a second overhand knot. Feed the rope through the second strap and secure to the top knot with a few half hitches. You can either stuff any excess rope away if the load is light or use it to fashion a waist strap if the load is heavy.

Check out these excellent videos on How to Build a Yukon Pack: Video #1 and Video #2

Tips and Tricks:

  • Take care in packing such that soft items are against your back and the weight within the pack is evenly distributed side-to-side.
  • Use a dry bag to further waterproof and contain your small items within the pack.
  • Leave items that you may need on the haul out of the pack as it’s hard to get at items inside the pack without completely unwrapping it.
  • A blanket may be used in place of the tarp although it will be less waterproof.
  • Wrap the pack tightly and at least 3-4 times for maximum security.
  • Use pipe insulation as a low-cost option for shoulder strap paddling.
  • Keep the load light for maximum comfort on long-distance hauls.
  • Practice constructing Yukon packs before entering the backcountry.

Yukon Pack vs. Other Portage Packs:

Pros:

  • You don’t have to carry the extra weight of a backpack amongst your gear.
  • The Yukon pack materials can double to make a tarp shelter.
  • They are much less expensive than most portage packs on the market.

Cons:

  • It can be a real pain to get into a Yukon pack without taking it apart.
  • They can take a considerable amount of time to build
  • They may be less comfortable to carry depending on the construction method used.

I hope that you find this tutorial interesting and helpful in your future Yukon Pack-building endeavors. I’m certainly looking forward to my next “All Yukon Pack” adventure and I hope that you’ll try this sometime too!

Happy Portaging!

-Kayak Dave

Categories: Kayak Camping, Virtual Instruction | 3 Comments

BioLite Introduces Revolutionary CampStove

BioLite recently introduced their revolutionary CampStove at the 2012 Summer Outdoor Retailer Show in Salt Lake City. The company specializes in the development of advanced energy products for third-world, disaster, and backcountry applications. Their stoves operate on an efficient, wood-burning technology to provide for a clean and safe cooking platform while simultaneously generating electrical power for charging small electronics off-grid.

Image courtesy of BioLite

The BioLite CampStove is unlike anything else I’ve ever seen in a backpacking stove! For starters, this stove doesn’t require the use of traditional canister or liquid gas fuels. Simply fill the fuel chamber with twigs and light them up like a small camp fire! The stove’s thermo-electric technology then converts heat from the fire into electricity that powers a fan to make the fire burn more efficiently. Excess power from the generator supplies a USB port which can be used to charge small electronics while the stove is running! The stove packs down to the size of a 1L Nalgene bottle and weighs in at just over 2lbs.

Image courtesy of BioLite

The concept of the BioLite CampStove is very exciting and I’m particularly drawn to the idea of a stove that can also supply power on-demand! I’m looking forward to getting my hands on one of these stoves to verify if some of the impressive specs such as boil time and charge time are up to snuff. Thankfully, the folks at BioLite believe that independent product testing is important and have agreed to supply a stove for me to try and report on. Stay tuned for this much anticipated review and more!

-Kayak Dave

Categories: Announcements, Gear Reviews | 1 Comment

Old Town Cayuga Family Introduced into Necky Manitou Series

Johnson Outdoors, parent company of Necky Kayaks, Ocean Kayak, and Old Town, will undergo a rebranding of a familiar model come the 2013 paddling season. The Old Town Cayuga family currently houses the Cayuga 130 and the Cayuga 146 as part of Old Town’s day touring class. The Cayuga Family is known for its stability, efficiency, and reliable performance in a variety of light touring conditions. As part of the Johnson Outdoors product mix, both Old Town and Necky share reminiscent designs and have always been close cousins in the industry.

The 2013 paddling season will witness the phasing out of the Cayuga name when both the 130 and the 146 will be reintroduced within the Necky Manitou product line. In a press release issued by Necky Kayaks, the company introduced two additions to the Manitou Series. The Manitou 130 R (formerly the Cayuga 130) and the Manitou 146 R (formerly the Cayuga 146) will see a minor redesign under the Necky brand but will retain all of its familiar design characteristics. “Melding sea touring hull design with the reassurance of a recreational kayak, the new Manitou 130 R and Manitou 146 R combine the maneuverability and tracking that avid paddlers need with the stability and comfort a newcomer will appreciate,” said Necky.

2012 Old Town Cayuga 130

2013 Necky Manitou 130 R

-Alex

Categories: Announcements | 1 Comment

How to Launch a Kayak from a Dock (VIDEO)

Launching from a dock can sometimes be a daunting but necessary task when kayaking. Often times a shore launch is not possible, therefore, it is important to understand how to properly and safely launch from a dock. This video post demonstrates the proper way to launch from a dock.

Photo Recap:

How to safely launch your kayak from a dock…

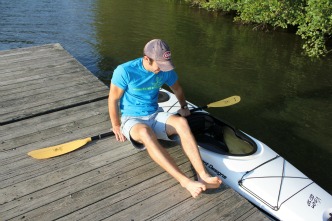
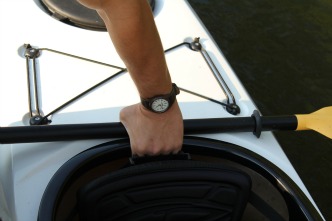
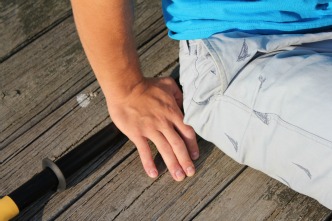
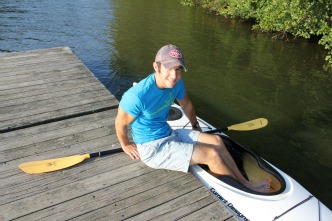
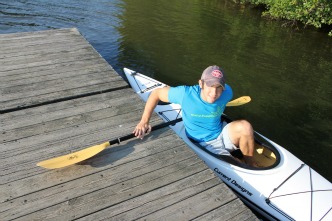
Step #1: Place your kayak paddle behind the cockpit rim. Sit on the dock next to your kayak with feet facing the bow.

Step #2: Secure both hands on top of the paddle shaft such that one hand is over the kayak and the other is over the dock. Grip the cockpit rim with the hand over the kayak. (Note: Do not place your fingers under the paddle shaft.)

Step #3: With both hands secured to the paddle shaft, place both legs inside of the cockpit rim.

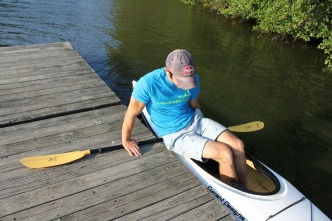
Step #4: Begin to lift and shift you body into the kayak.

Step #5: While keeping your hands on the paddle shaft, move the rest of your weight into the kayak and securely sit in the seat.

Key Points:

  • Keep both hands on the paddle shaft throughout the entry to secure the kayak to the dock.
  • Sit on the dock before attempting entry in order to maintain a low center of gravity. Stepping directly into the kayak is dangerous as the kayak can slip away and you can easily fall into the water or (worse) back onto the dock. If the dock is too high to perform the seated entry described above then I recommend scouting for a safer area to launch from first.

-Alex

Categories: Virtual Instruction | Comments Off on How to Launch a Kayak from a Dock (VIDEO)

Trip Report: Thumb & Humpy Coves, Resurrection Bay, Alaska…Part 1

Part 1 – “Our Great Alaskan Adventure!”

Have you ever been on an amazing trip that you enjoyed every minute of but still couldn’t wait for it to end? This is exactly the feeling that I had during my first trip to Alaska in June 2011. Don’t get me wrong, I didn’t want the trip to end so that we could get out of Alaska (my girlfriend basically had to wrestle me back onto the plane). I just couldn’t wait to get to the highlight of this highlight trip: a two-day get-away down to the port of Seward to check out Kenai Fjords National Park and do some real, Alaskan sea kayaking!

I have dreamed endlessly about traveling to Alaska ever since I picked up my first kayak paddle but, believe it or not, Meaghan was the one who suggested that we take our summer trip to Alaska. The main goal of the trip was to visit with her college roommate Maura who was living with her husband John in Anchorage at the time. John, a Captain in the US Army, was stationed at the Elmendorf Air Force Base preparing with his medical unit for an upcoming tour of duty in Afghanistan. To add to the company, Meaghan’s other college roommates Katie and Anna (the twins) were also planning to visit that same week! All things considered, it took zero convincing on Maura’s part for us to make the trip!

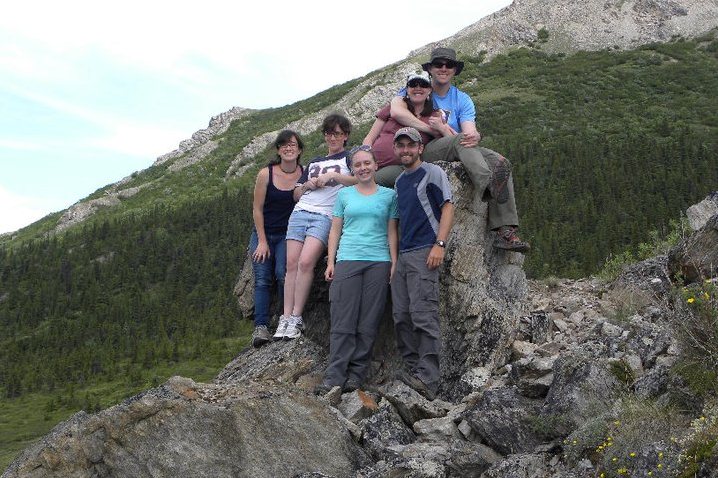
The group in Denali NP: Anna, Katie, Meaghan, Kayak Dave, Maura, John

Our time with Maura, John, and the twins in Alaska was incredible! On our first day, Maura took us on a hike in Eagle River, AK where I saw my first wild moose a mere 2 minutes down the trail!  The next three days were spent in and around Denali National Park where we saw Grizzly Bears from the park bus, played chicken with a Caribou at the Savage River, hiked to the top of Mt. Healy, and relaxed in our quaint, park-side cabins. A day of gold panning in Girdwood, a hike up Flat Top Mountain in Chugach State Park, and an afternoon in downtown Anchorage rounded out an amazing trip with our incredible friends!

Meaghan knew that there was no way that we could go to Alaska and not have at least one day of sea kayaking on the itinerary. Lucky for me, she was also the one to suggest that we take TWO days at the end of the trip to spend time paddling near Seward, AK! You can probably imagine how excited I was when we climbed into our rented Ford Fiesta and sped South on the Alaska 1 toward the Kenai Peninsula!  As the purple Sea of Lupines and snow-capped peaks of Kenai flew by on both sides all I could think was: “We’re about to go paddling in ALASKA!!!”

Swimming in a Sea of Lupines, Kenai Highway Alaska

When we first arrived in Seward we drove straight through it. Our mission: to find a place called Miller’s Landing, just south of town where we would meet up with the guide who would take us across the Bay. Thankfully, there was only one road that led south out of town and it took us straight there! At Miller’s Landing we met our guide Andrew. Like me, Andrew was a Harvard student who was addicted to adventure. However, he was operating on a whole different level. His story started a year earlier in Cambridge, MA when he decided to take off on a cross-country road trip to experience the best of America. Turns out there’s a whole lot of great things to experience and after running out of money and gas in Seward in the late spring he decided that he’d try his luck at guiding kayak trips. So, Andrew was our guide and I had all of the confidence in the world that our trip would be as incredible as his story!

An aside: I’m known for doing two things when I decide to go paddling while on vacation. First, I like to do some research into local outfitters so that I can hire a guide to take me on a trip. I love to go on guided trips or at least consult with local guides because they typically know the nuances of the waters and have the inside scoop on the best places to go. Second, if I go on a guided trip, I never let the guide know that I have over 10 years of kayak instruction and guiding experience unless I have to! This is professional courtesy to the guide as they are in charge of the trip. Plus, I don’t want to have to think about things like boat traffic, weather hazards, and navigation when I’m trying to take in the scenery!

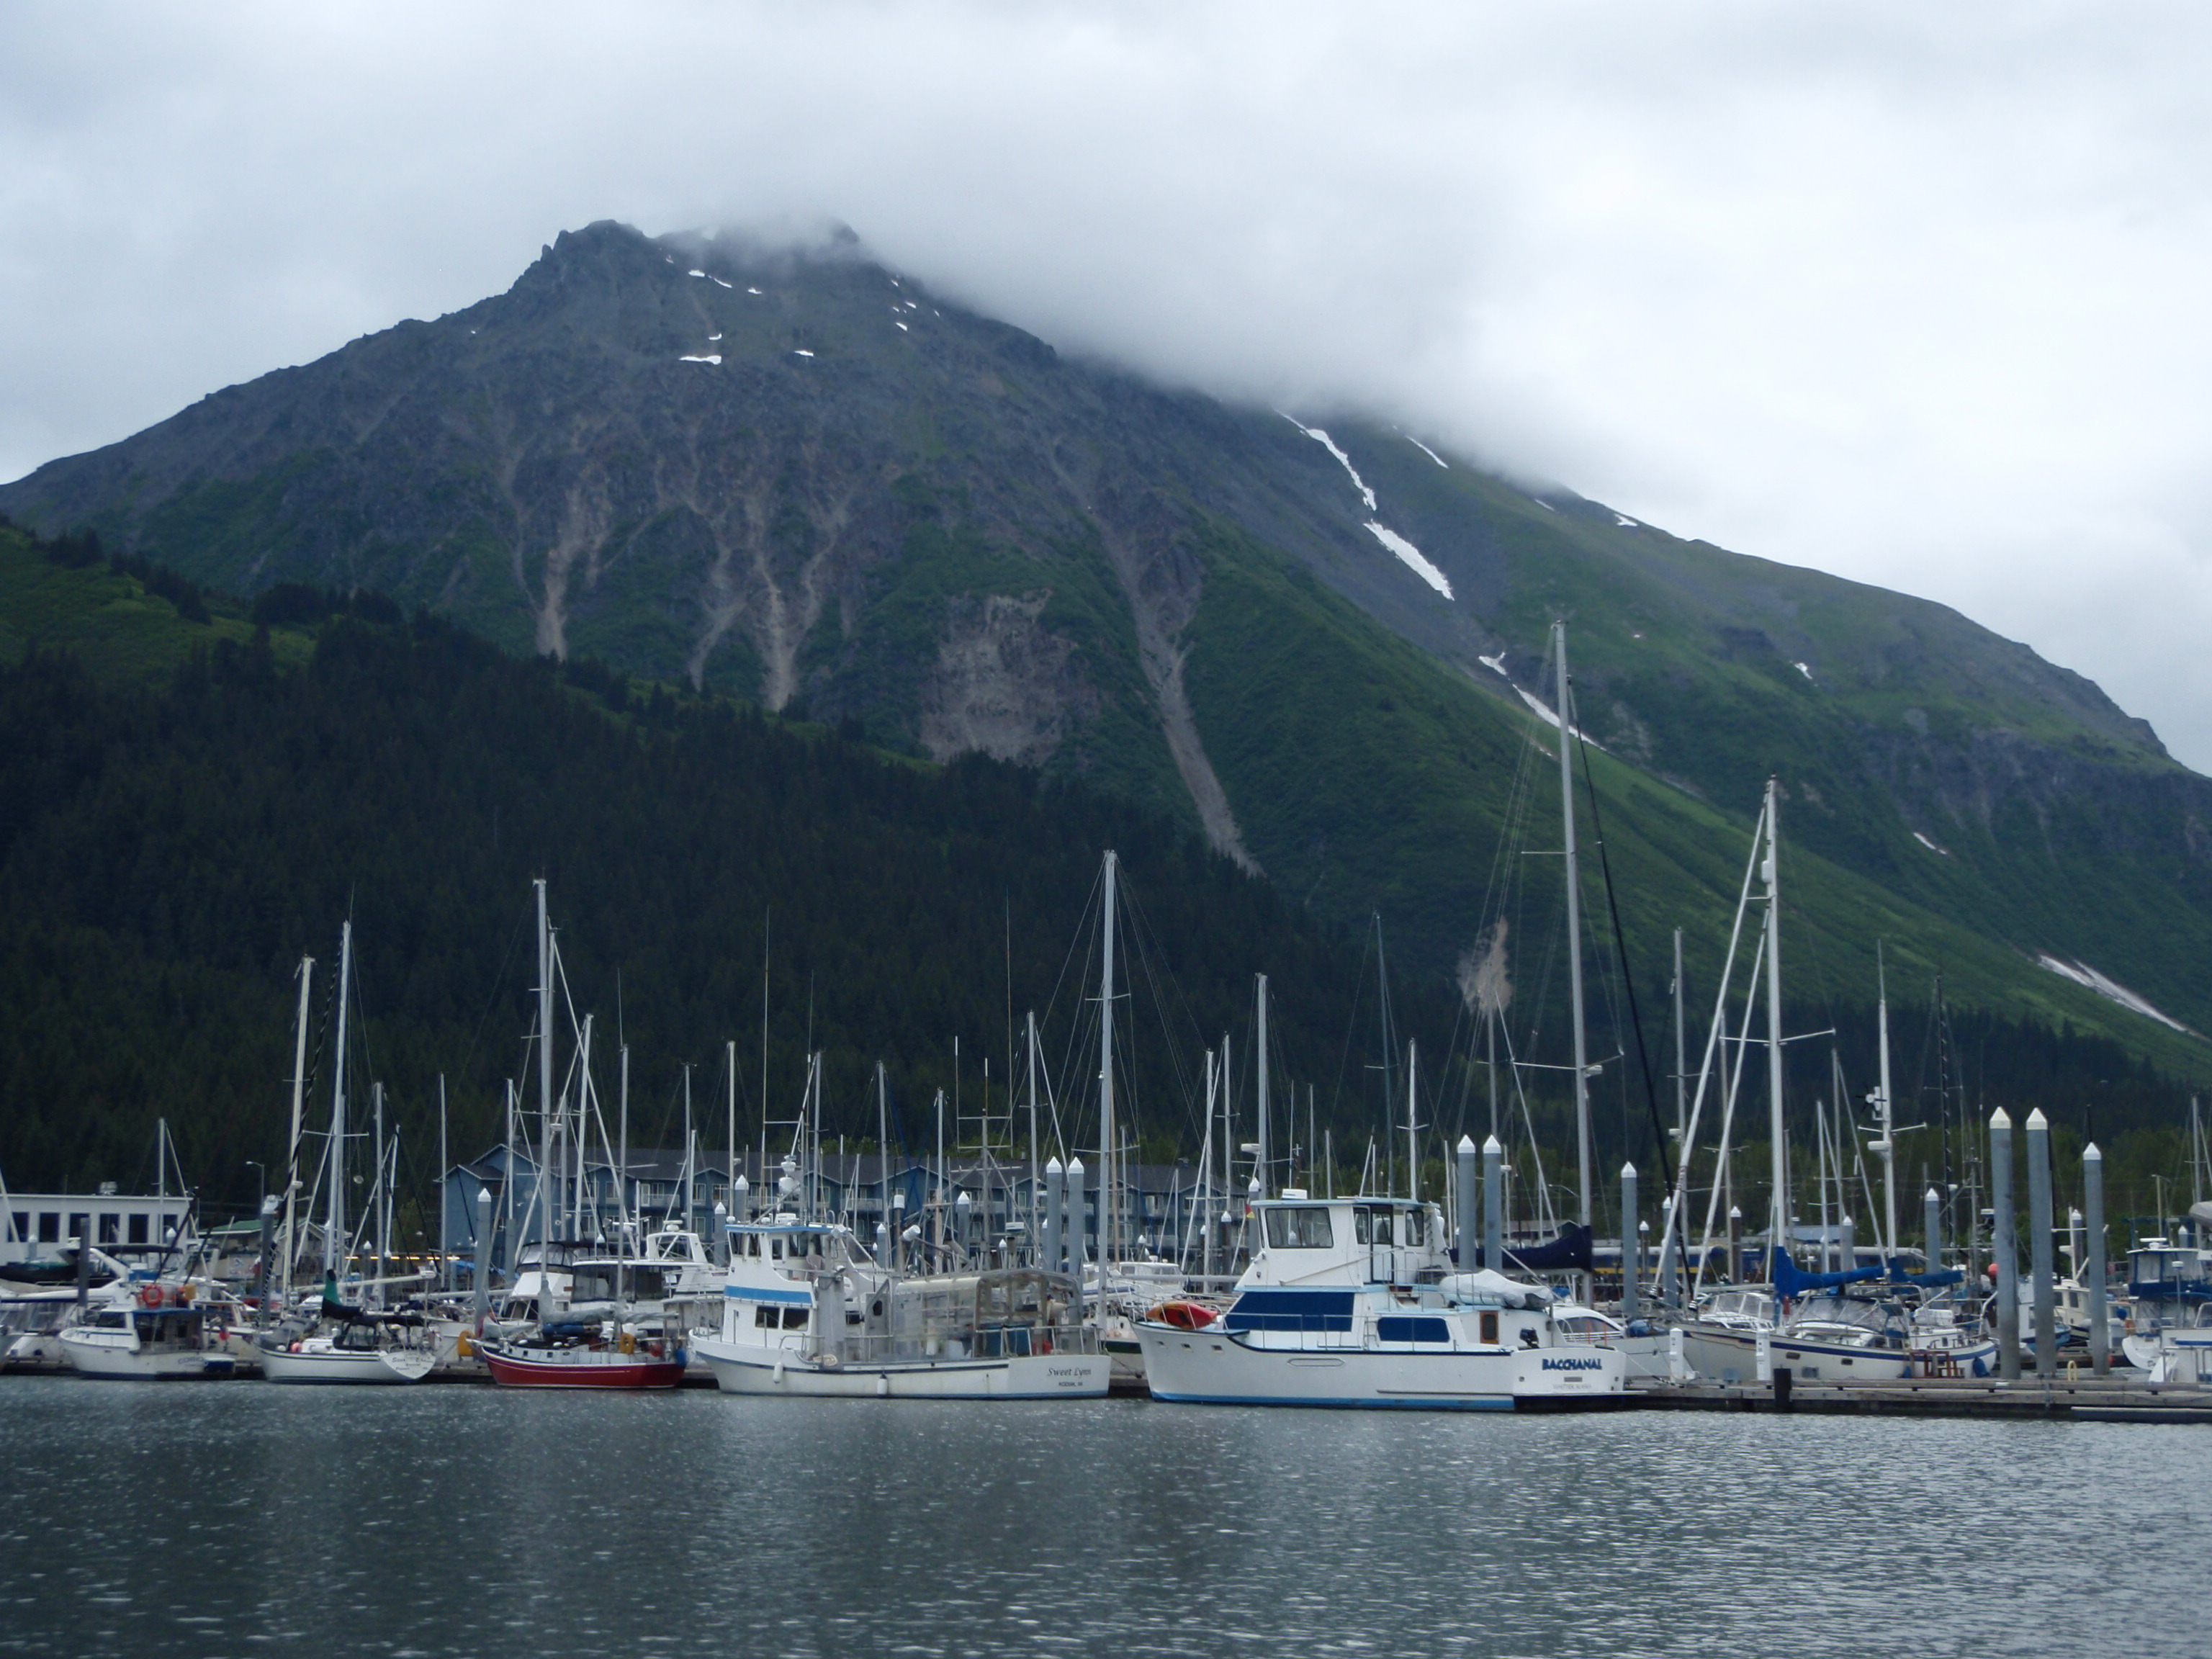
A shot of Seward with Mt. Marathon in the background (yes they run up that!)

The trip that we had signed up for was a 4 hour tour of Thumb and Humpy Coves which lie on the eastern shores of Resurrection Bay just south of Seward. This trip promised view of alpine glaciers and a few short hikes to some spectacular water falls. It also offered the possibility of seeing some marine mammals! What I wasn’t expecting was that Meaghan and I would be getting a private trip! It was billed as a small group trip but no one else seemed to have signed up that day and Andrew was happy to oblige. He walked us through the typical pre-trip spiel on the principles of the wet exit, fit us with PFDs, and pulled our clunky tandem kayak down to the edge of the rocky beach. There we sat and chatted up a storm while we waited for our taxi ride to Humpy Cove.

The water taxi looked like a modern landing craft as it slid up onto the beach. It was relatively flat bottomed with a ramp on front, a deck with kayak racks in the middle, and a closed cabin on the back. It was kind of nice (and also a little weird) to be ushered up the ramp to the cabin while the crew handled getting the kayaks and gear on board. Before long we set off across the Bay all the while entertained by the youthfulness of the crew and the stories of the Captain. In his late twenties, the Captain was a sea-hardened man who looked like he hadn’t slept in days because he hadn’t. As a co-owner of Miller’s Landing, he was constantly on the move ferrying clients throughout the Bay and maintaining his fleet of water taxis. When the “summer” left Alaska he would follow it to Antarctica! If all of this hadn’t been explained to us then the stack of coffee cups would have told the tale!

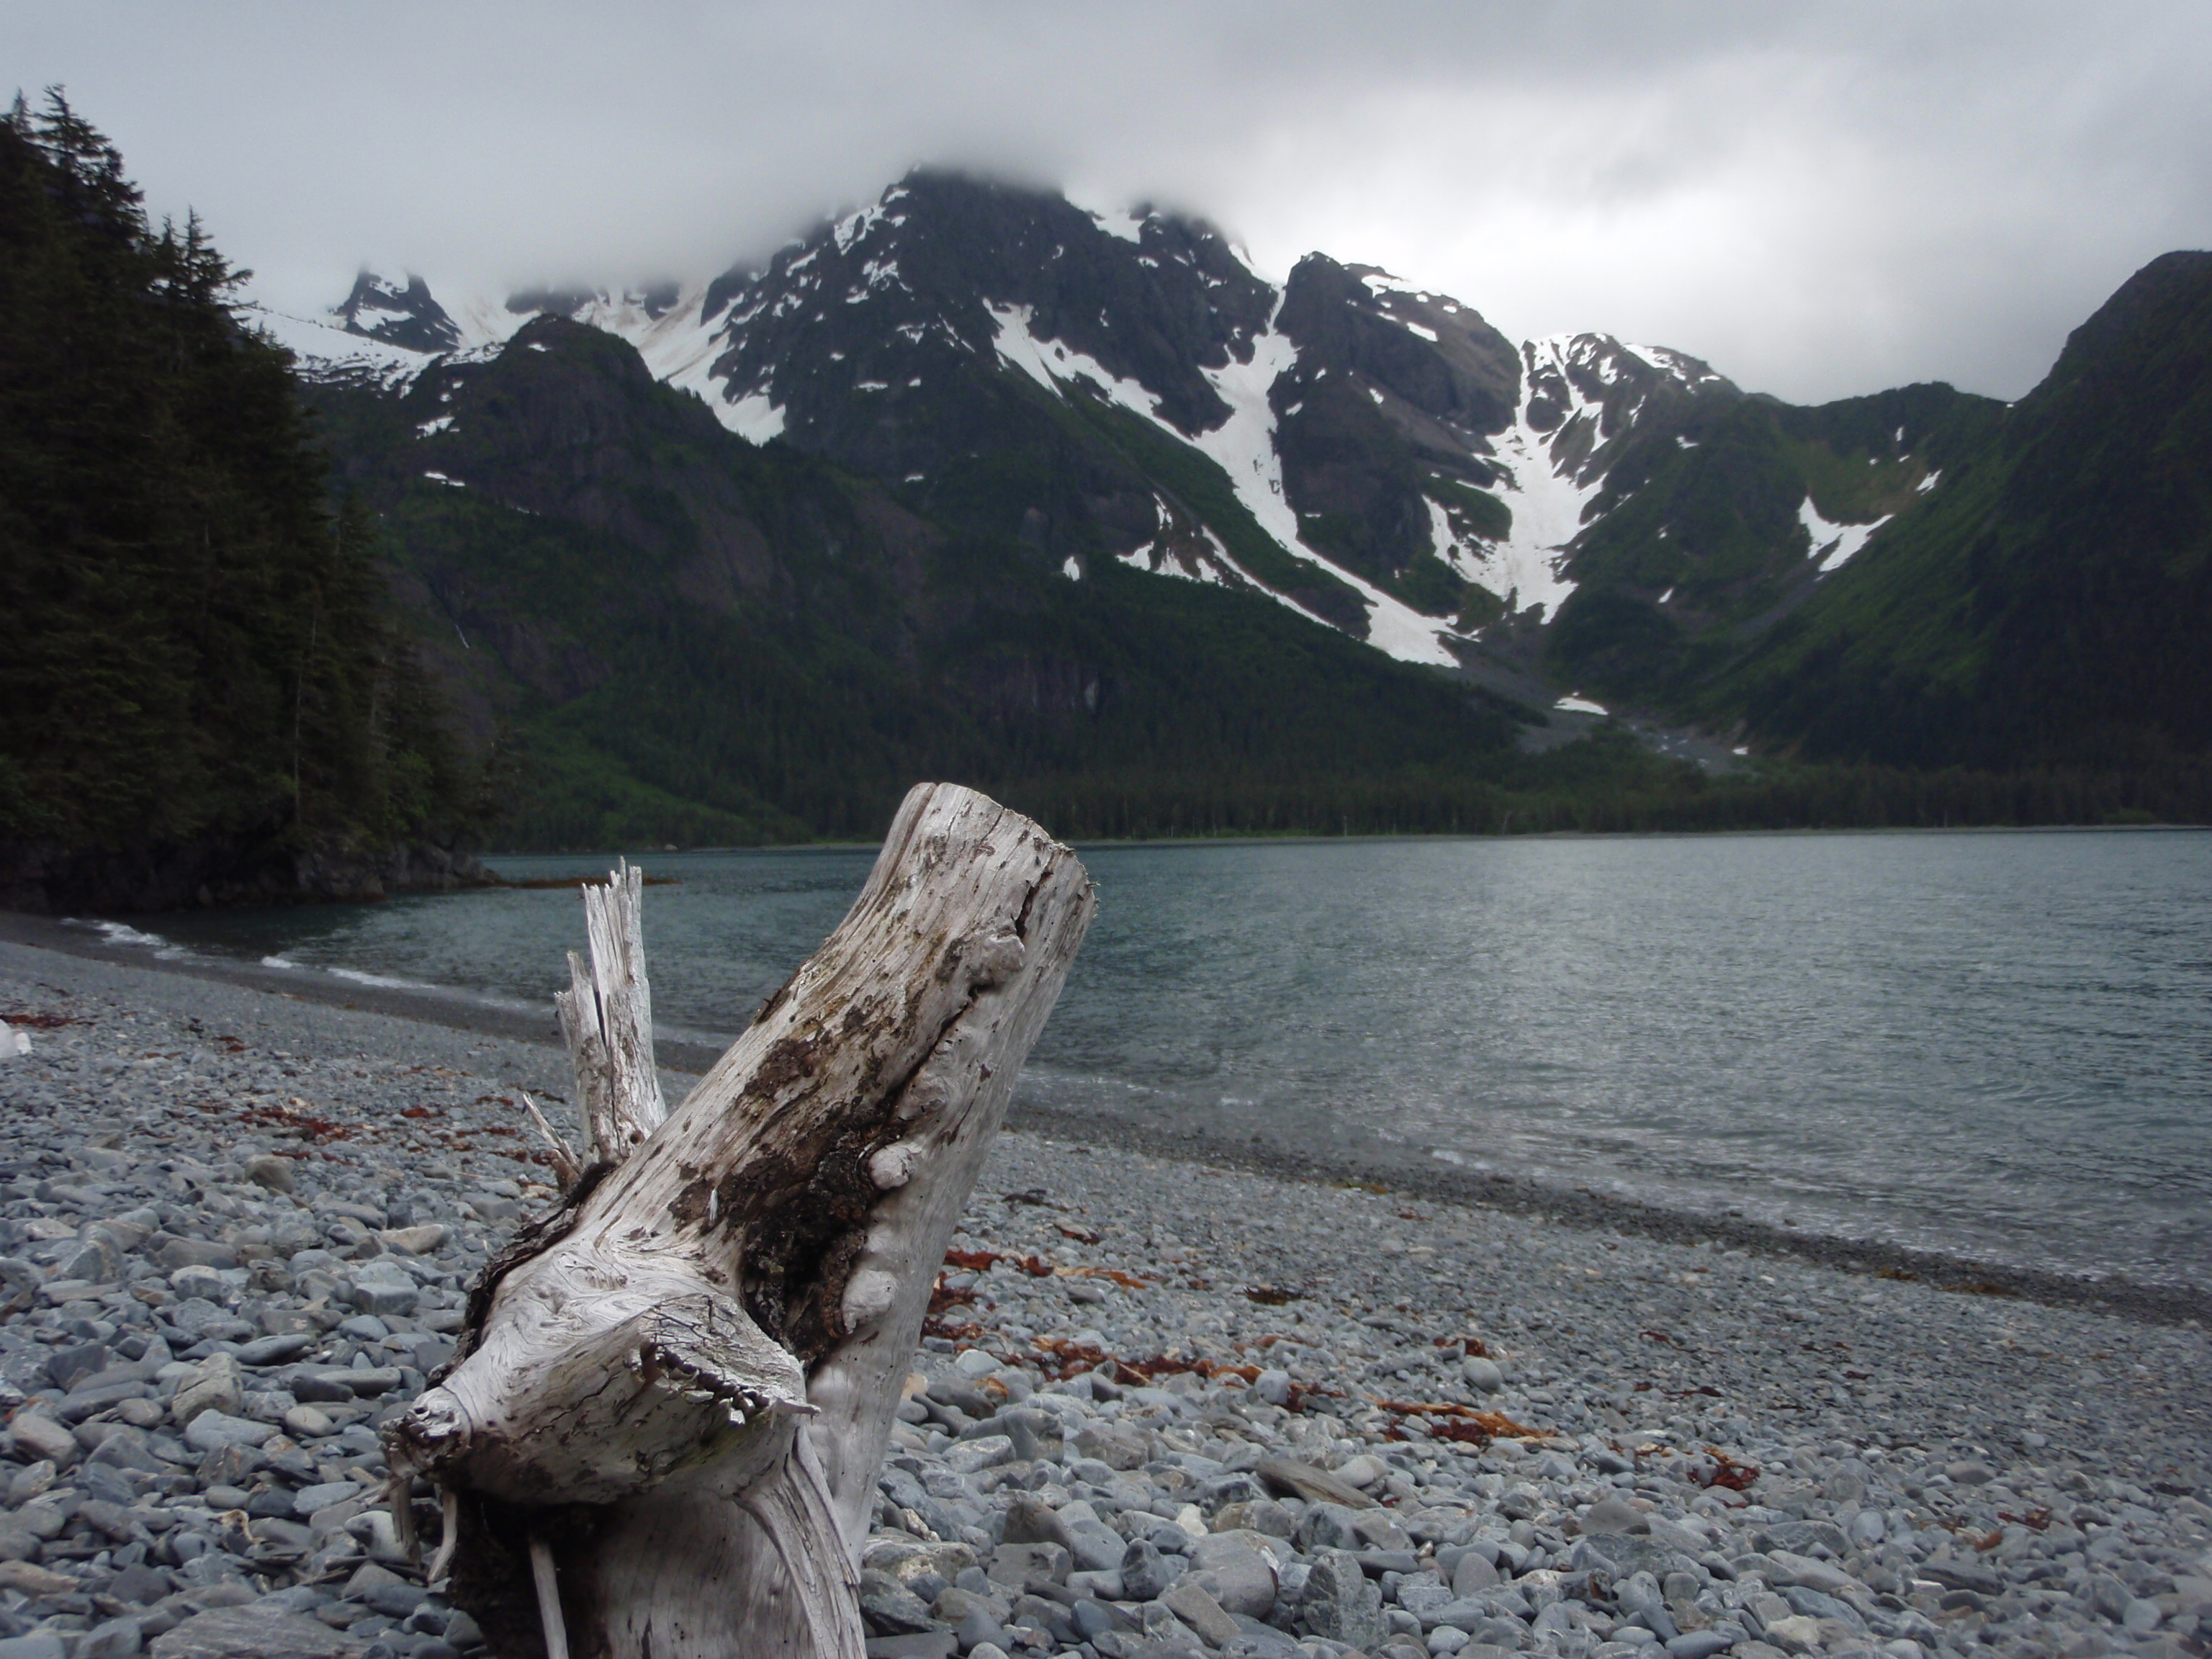
Landing Beach in Humpy Cove

Before long we had arrived in Humpy Cove. The Captain spotted a deserted, rocky beach where he landed the taxi and ordered the crew to drop the ramp. Stepping off that ramp was like taking a trip back in time. The beach was made up of fist-sized rocks, polished by the cyclic tides of centuries. Thick, temperate rainforest encroached on the beach and blocked any escape from the coast. Across the cove, 4000ft peaks thrust into the low clouds as alpine glaciers hung to their flanks; a reminder of the glorious ice that once was! The cold waters of Humpy Cove were flat like glass and there wasn’t a boat of any sort in sight! We were in for a paddling adventure that we’d never forget!

More to come in Part 2 – “Otters, Eagles, and a Rusty Old Truck”

-Kayak Dave
Categories: Trip Reports | 1 Comment

Photo of the Week: “Swashbucklers”

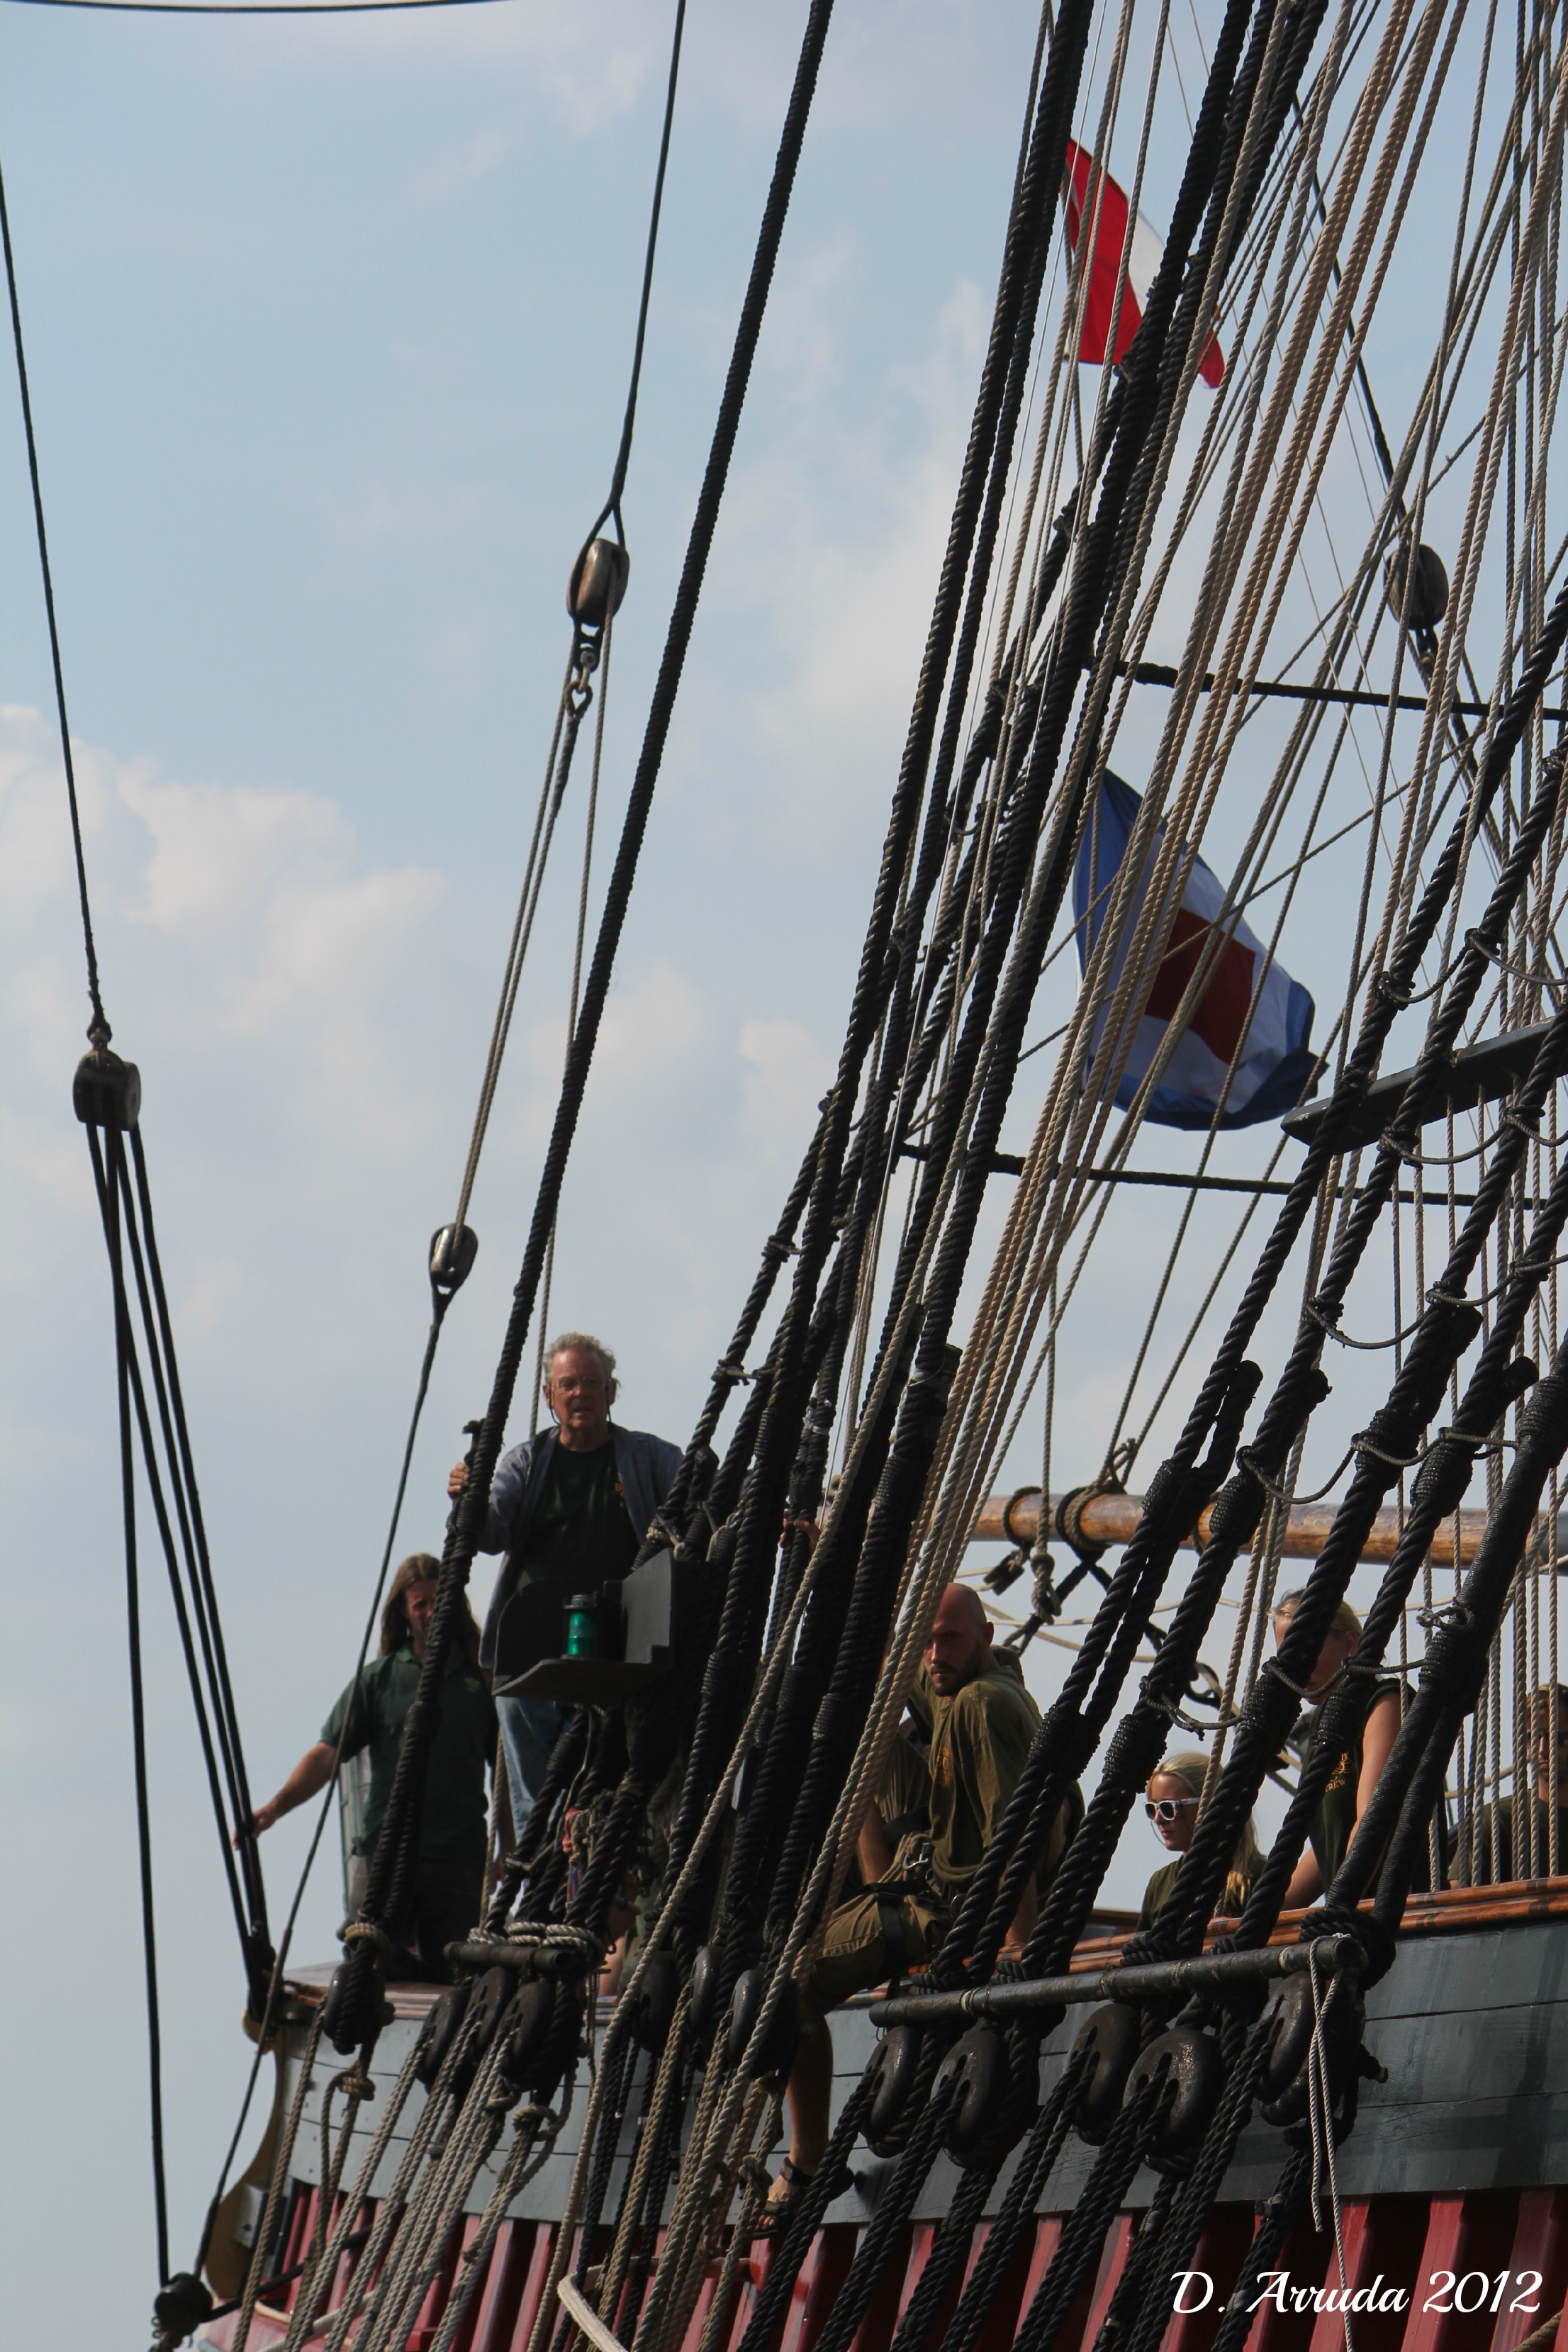
The tall ship HMS Bounty, star of the film “Mutiny on the Bounty”, made a stop over in Plymouth Harbor as part of its 2012 East Coast Cruise. The photography club was a buzz with rumors of when the ship would arrive in port and I ended up “chasing” it for a few days to grab that elusive arrival shot! Watching the Bounty as it lay at anchor off of the Gurnet I had day dreams of what Squanto must have felt like when he first saw the sails of the Mayflower in Plymouth Bay! Two days later the Bounty was on the move and I hustled down to the waterfront to start snapping off pictures. “Swashbucklers” depicts the motley crew along the starboard rail as they work to secure the Bounty to State Pier next to the Mayflower. Stay tuned for more photos from this set in the weeks ahead!

-Kayak Dave
Notes: The photo was taken with my Cannon EOS Rebel T2i DSLR camera with EF-S 55-250mm lens . The camera was set to aperture priority with f/8 and ISO 100 to calculate a shutter speed of 1/640s. The focal length was 123mm.

Categories: Photo of the Week | Comments Off on Photo of the Week: “Swashbucklers”

Old Town Cayuga 130 Review

The Deets:

Material: Single Layer Polyethylene

Class: Day Touring (Light Touring)

Length: 13’1”

Width: 25”

Weight: 50 lbs

Cockpit Size: 34.5 x 16 inches

Capacity: 225-275 lbs

Hull Type: Shallow U-Shaped

Hatches/Bulkheads: Bow and Stern

Rudder/Skeg: Optional Rudder

MSRP: $979 ($1219 with rudder)

The Review:

The Old Town Cayuga 130 is a well-outfitted, day-touring kayak that’s a great choice for the beginner-intermediate paddler interested in exploring near-coastal waterways. The fish-formed Cayuga 130 tracks fairly well for a 13’1”-long kayak despite lacking a prominent keel-line. As suspected, the 25inch beam and shallow, U-shaped hull demonstrates solid primary stability with a smooth transition to a reliable secondary. Material-wise, its single-layer, roto-molded polyethylene construction provides for a durable and relatively light-weight (50lbs) craft.  The 2012 Cayuga 130 is available in two colors: cloud (blue/white) and yellow, however, earlier models may be found in sunrise (red/orange/yellow), lime green and dark green. An optional rudder system is also available for an additional $240.

In all of my years of kayak instruction and sales experience it’s hard to think of two kayaks that are more substantially equivalent in design and performance than the Old Town Cayuga 130 and the Necky Manitou 13! This may not be all that surprising since both craft fall under the larger Johnson Outdoor umbrella. Anyway, the reasons why both of these kayaks are excellent choices for the beginner paddler abound. Reliable stability is one of the most sought-after features for a beginner paddler. Both craft are very forgiving in the stability department with excellent primary stability and a soft transition to reliable secondary stability. Furthermore, both track fairly well with minimal weather-cocking in light to moderate winds and seas. The Manitou 13 (45lbs) is slightly lighter than the Cayuga 130 (50lbs) but this 5lb difference should be a small compromise after reading the rest of this review!

I have mixed feelings regarding the changes made to the 2012 version of the Cayuga 130 cockpit. The most prominent cockpit change is the addition of the standard Johnson Outdoors “Active Comfort System” seat. This seat offers 4-point adjustment that allows you to tweak the seating position for perfect comfort. I’ve found it to be more comfortable, sturdier, and less bulky than the previous seat found in the Cayuga 130. However, the 2012 model took a step backward by reverting to the cheap foam pads for thigh braces that were once found in the older Manitou 13 models. The adjustable, contoured foam thigh braces which were once a standard feature on the Cayuga 130 are now offered as an option. I would not buy a Cayuga 130 without upgrading to this thigh brace option as it will better allow for you to develop edging and bracing skills.

The Cayuga 130 really separates itself from the Manitou 13 with its additional hatch and superior deck outfitting. The Cayuga 130 has fore and aft hatches and bulkheads while the Manitou 13 only has one hatch and bulkhead in the stern. This additional hatch accounts for most of the 5lb difference between the two kayaks but it makes the Cayuga 130 safer and more versatile for near-coastal adventures! The hatches feature the standard Johnson Outdoor hatch cover which is a one-piece, plastic cover with a rubber seal. I’ve found that this system is far from watertight so make sure to stow any gear that you want to keep dry in dry bags! Finally, Old Town offers an optional rudder on the Cayuga 130. I’m not a big proponent of rudders on light-touring kayaks as they typically do more harm (by creating bad habits) than good. The tracking of the Cayuga is fine for its designed use as a day-touring kayak and there’s really no need for a rudder in this case.

Word of caution: Some folks who are interested in the Cayuga 130 may be tempted to move up in length to the Cayuga 146 (14’6” long). I’ve test paddled both of these kayaks in windy conditions (15+knots) and I’m confident to report that the Cayuga 130 is a far superior craft in terms of tracking and even slightly so in terms of stability. It’s my opinion that the Cayuga did not scale up very well to the 146 length and that this version should be avoided!

In summary, I find that the Cayuga 130 is a great choice for the beginner/intermediate paddler interested in building their skills on near-costal adventures. This is based on its solid stability and good tracking in light to moderate conditions. I have mixed feelings with respect to changes in the cockpit outfitting of the 2012 Cayuga 130. The new seat is a nice improvement over older models but I highly recommend upgrading to the optional contoured thigh braces so that you can get the most performance out of this kayak. In general, the Cayuga 130 is substantially equivalent to the Necky Manitou 13 in terms of design and performance but I’d give the Cayuga the nod in a head-to-head because its second hatch and bulkhead improves safety and versatility for near-coastal use.

-Kayak Dave
Pros: Excellent stability profile, Comfortable seat, Fore and aft hatches and bulkheads.

Cons: Contoured thigh braces no longer a standard feature.

Demo Notes: I have test paddled the Cayuga 130 in both calm and windy conditions over the past 4 seasons.

Kayak Dave Rating:
UPDATE: The Old Town Cayuga Family will be rebranded in 2013 under the Necky Manitou Series as the Manitou R. See article,  Old Town Cayuga Family Introduced into Necky Manitou Series for more information on the Manitou 130 R and 146 R.


Categories: Kayak Reviews | 2 Comments

The Slocum Challenge Chapter #2

Chapter 2:  “In Search of the Elusive Plop”

Let me begin with a moment that perhaps some of you can relate to from my fist summer of kayaking 20+ years ago. Having had my first lesson, I felt confident enough the following Saturday to cross the 75 yard channel separating Marion’s inner harbor from it’s outer harbor. Because?

…Well, because I had practiced my low and high brace without capsizing even once. So that must mean that I was in pretty good shape to handle “stuff”. Even though I had little idea as to what stuff was at that point in time.

About half way across the channel, the opposing wind and waves created a death defying 5” to maybe 7” chop. By then, I had episodically started holding my breath imagining a host of worse case scenarios, yet this little voice kept reminding me of staying centered. It was not a very strong voice at all but at least it was there.

After planting a tenuous paddle stroke into the approaching beam wave on my left, I stared to capsize in slow motion to the opposite side. At which time I released my right hand from the paddle shaft and deftly placed my palm on the water to “brace” myself. Let the paddling world take notice that here was someone destined to be a true sea kayaking legend!

Thank goodness that little voice came back.  I snapped my hip up enough to center the kayak and maintain my weight over the mid-line of the boat. I simultaneously grabbed the paddle again and planted it into that same wave that was now surfacing on the right side of my kayak. When I made it to the other side I stopped and laughed like a fool for a good minute or two.  Not exactly the stuff of Sir Edmund Hillary’s summiting the south peak of Mt Everest!

Today, what I find to be most challenging are confused seas, as there are no predictable patterns and the opportunity to broach is always present. I have a fairly reliable high brace; but I cannot roll my kayak despite the efforts of several talented instructor friends.

Paradoxically, it has also been at those times when I encounter confused seas that I have been most able to stay in the moment and focus upon just one element of my stroke to keep the demons of doubt at bay. In other words, I have a strategy to handle my variety of stuff and that leads me to the point of this chapter. What has caught my interest in paddling the Slocum Challenge this year is for it to be an exercise in “mindfulness” or the quest for the ever-elusive “plop”…my silent mantra. Let me digress for a minute to explain what “plop” means to me.

The “catch phase” of a forward stroke is the smooth placement of the paddle blade into the water out near your foot. Think of it as catching the water for an instant before you start to uncoil your body and pull yourself up to and past the paddle. When done properly, there is very little splash as the paddle enters the water. To me it sounds like a “plop” sound when done correctly. What I have also noticed when I am pushing too hard is a huge splash sound caused by my paddle starting its “power phase” before it has even fully entered the water.

This year will be my 5th Slocum River Regatta/Challenge. My goal is to see what happens when I worry less about who is closing the distance from behind or about how hard to push the “Barf-O-Meter”, as I try to achieve a preconceived goal for myself that is not realistic. This year’s goal is to simply be more mindful about the moment I am presently in without imposing any judgments upon that experience and to see what happens.

This is what I have been trying to do more of as the Challenge date draws closer. As a once a week paddler, I am not able to get out on the water any more often than in past years so that part will be a constant. What will be different will be my focus. What will be different will be to see if my time is slower or faster than in past years and to see if the overall experience is more enjoyable.

Before I close out this second chapter, let me suggest a mindfulness challenge of sorts. The next time you are out on the water and the conditions are relatively calm and there are no apparent dangers around you, try this two-minute exercise:

Paddle at a comfortable pace, close your eyes and focus upon just one element of your forward stroke. Just keep that element in mind as your sole focus. Let it become your silent mantra. Then just notice what is happening. Do you notice subtle shifts in the wind on your cheek or that the slapping of the wave against your bow seems louder on one side than the other? Do you become aware of your kayak turning to one side more that the other because your paddle stroke is 6” longer on one side than the other; or perhaps that your grip on the paddle shaft has loosened a little?

Well you get the idea. Judgments fall by the side and pure enjoyment of being on the water may just have increased.

Chapter 3 will be my post race reflections on whether or not I achieved my goals.

Paddle on!…To be more accurate: Plop on!!

– Boreal Alvik


Categories: Other Adventures | Comments Off on The Slocum Challenge Chapter #2

How to Build a Tarp Tent for Kayak Camping

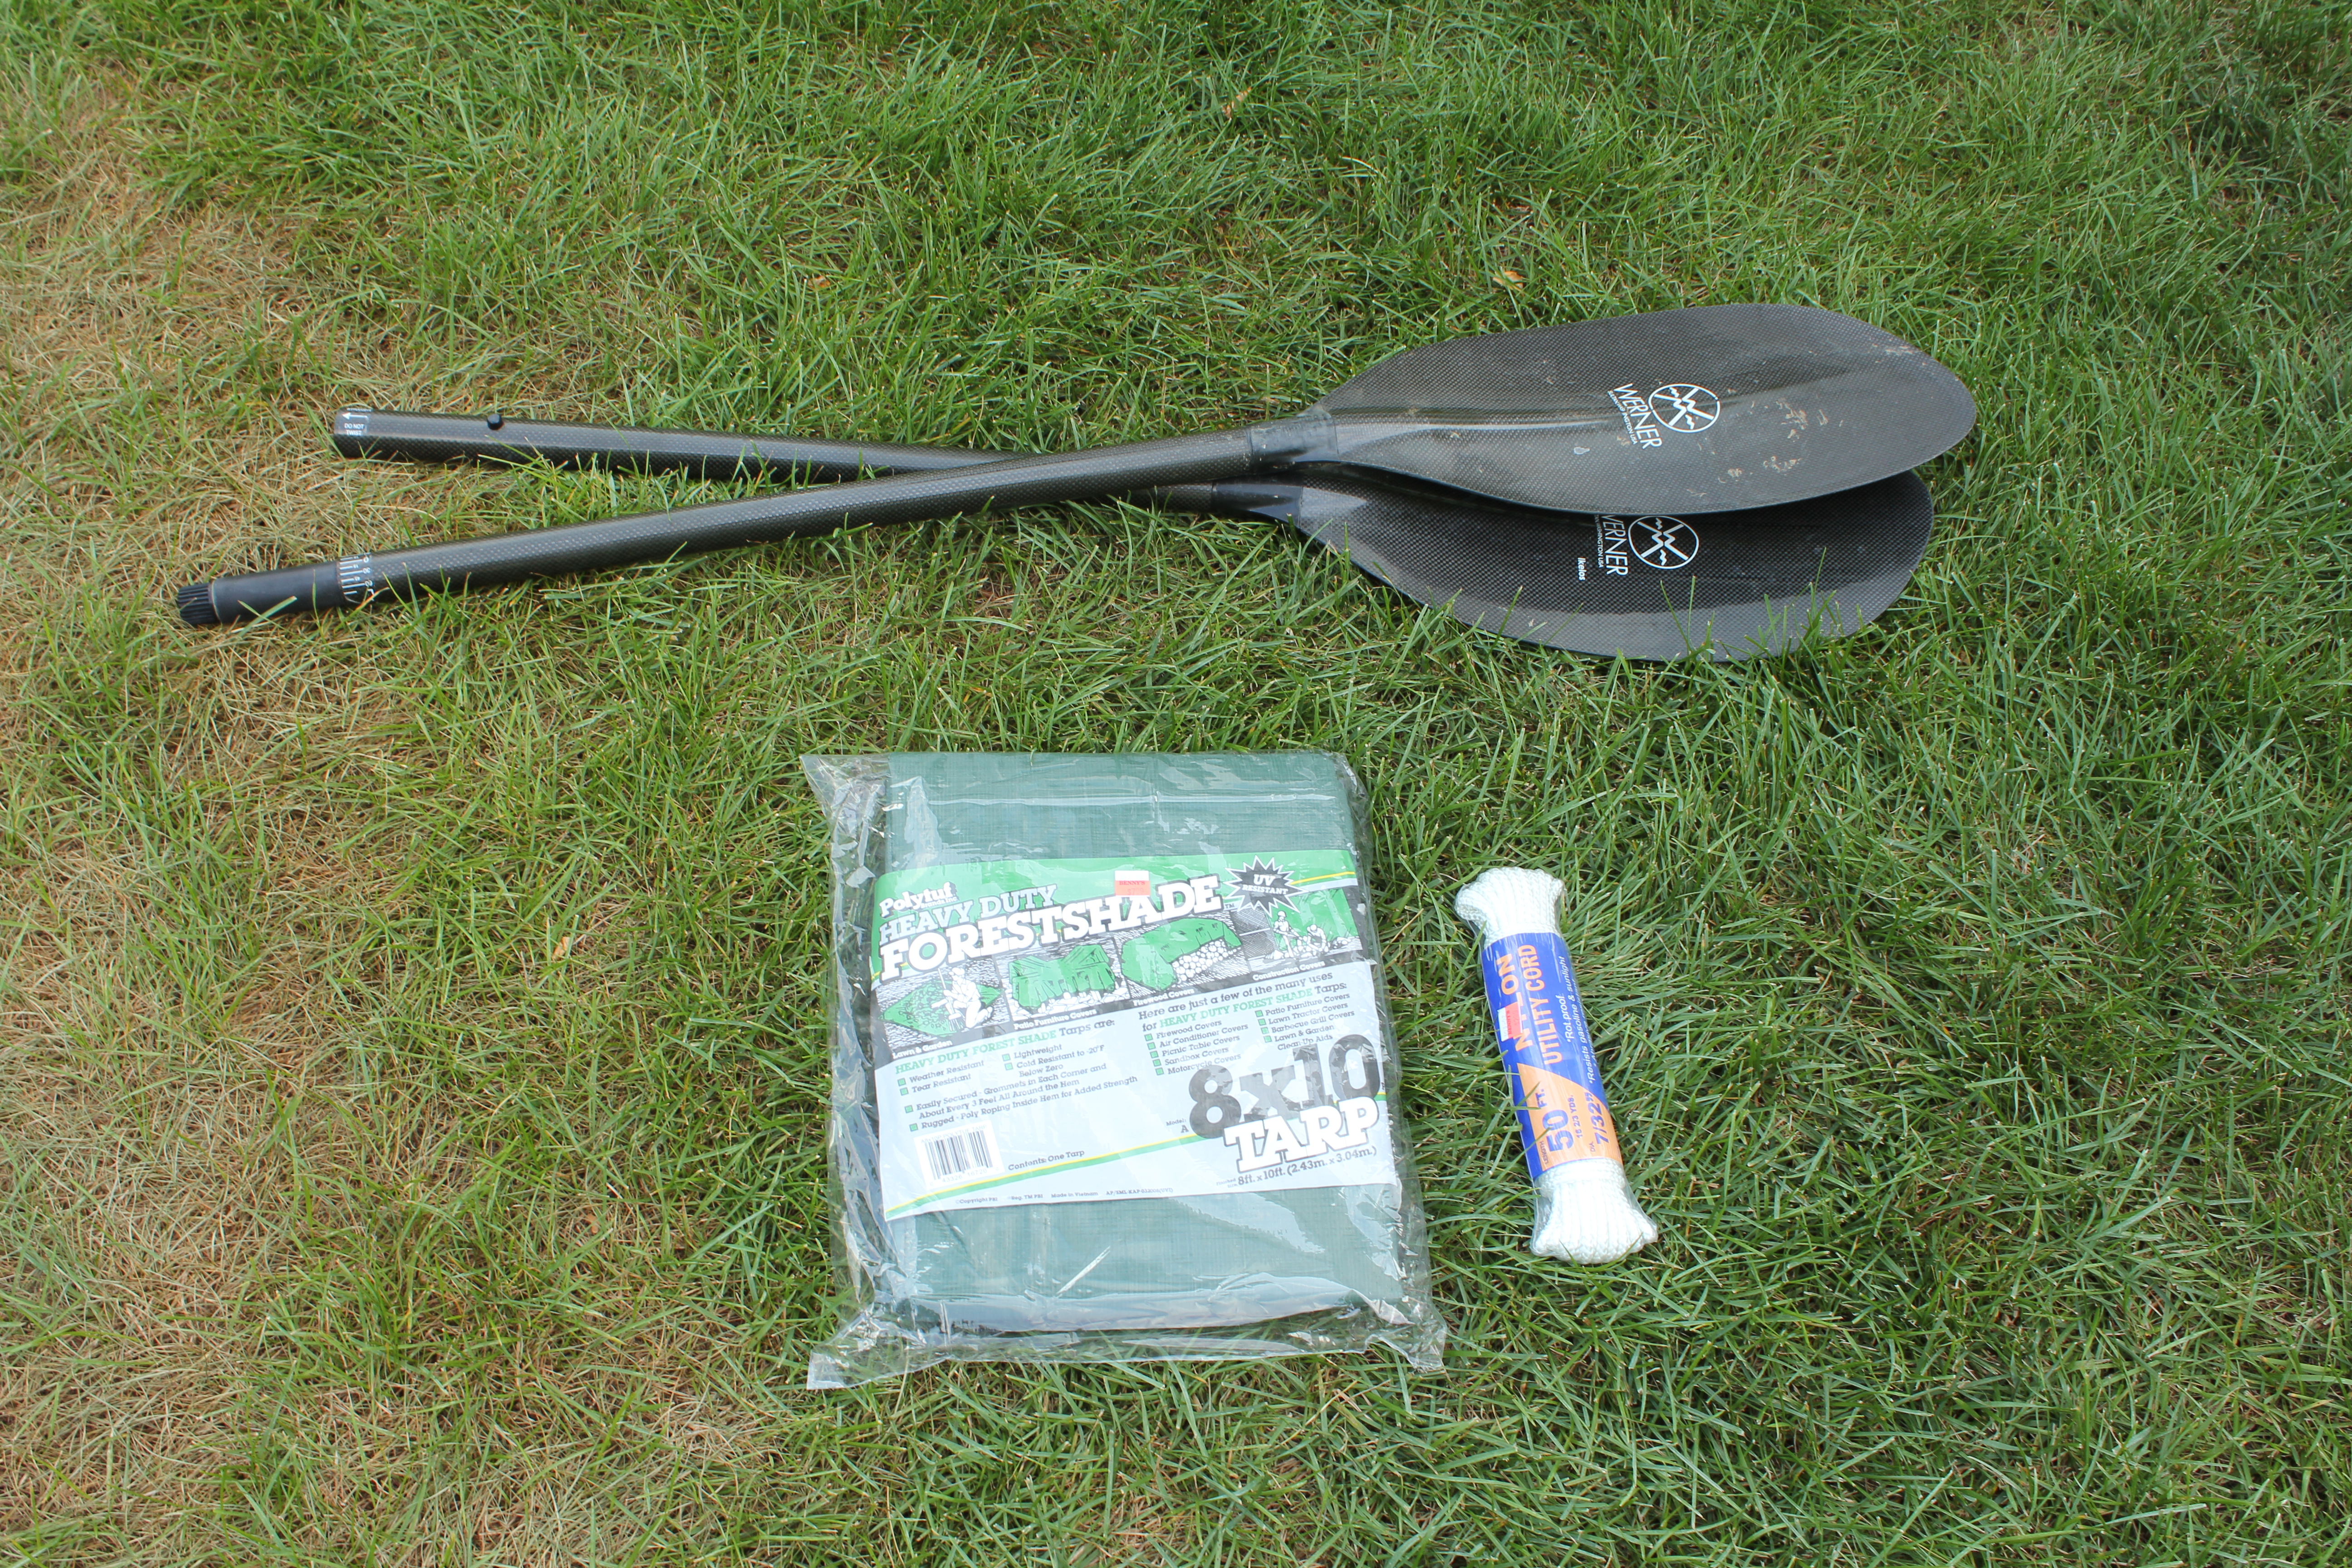
What if I told you that all you needed to carry in your kayak to build a shelter was am 8x10ft tarp, about 30 feet of rope or cord, and maybe that two piece paddle that got you to your cast-away campsite? Better yet, what if I told you that these basic shelter supplies cost under $10.00 at your local hardware store? This magical haven that I speak of isn’t a fish tale…it’s a tarp tent!

Tarp tents make for a great shelter because they’re simple, versatile, light-weight and can be ultra-low cost. Literally all you need is a tarp, some rope, and two trees (or paddle halves) to pitch it between! The thing that should jump out to a kayak camper is that most of what you need to build a tarp tent (the rope and maybe a paddle) is already on board. The addition of a tarp to your standard gear shouldn’t add much weight (1-2lb) or impact your wallet. From there, pitching the tarp tent is mostly a matter of imagination and necessity. In this post, I’ll show you a couple of basic tarp tent configurations and provide some tips to set you on your way:

Basic Tarp Tent Materials:

Tarp tents are constructed of lightweight and inexpensive materials

  • 8×10 ft tarp (this size is “comfy” for two people)
  • 30ft of rope or parachute cord (a towline is about this long)
  • 2 supports (these can be two trees, two paddle halves, or a combination of a tree and paddle)
  • 4-6 tent stakes (these can be store-bought or constructed of sticks or rocks)

Tarp Tent Configurations:

There are literally dozens of ways to pitch a tarp tent. Here we’ll focus on the usefulness and construction strategies associated with some of the more common designs including: the A-frame, the Lean-to, and the Over-kayak.

The A-Frame:

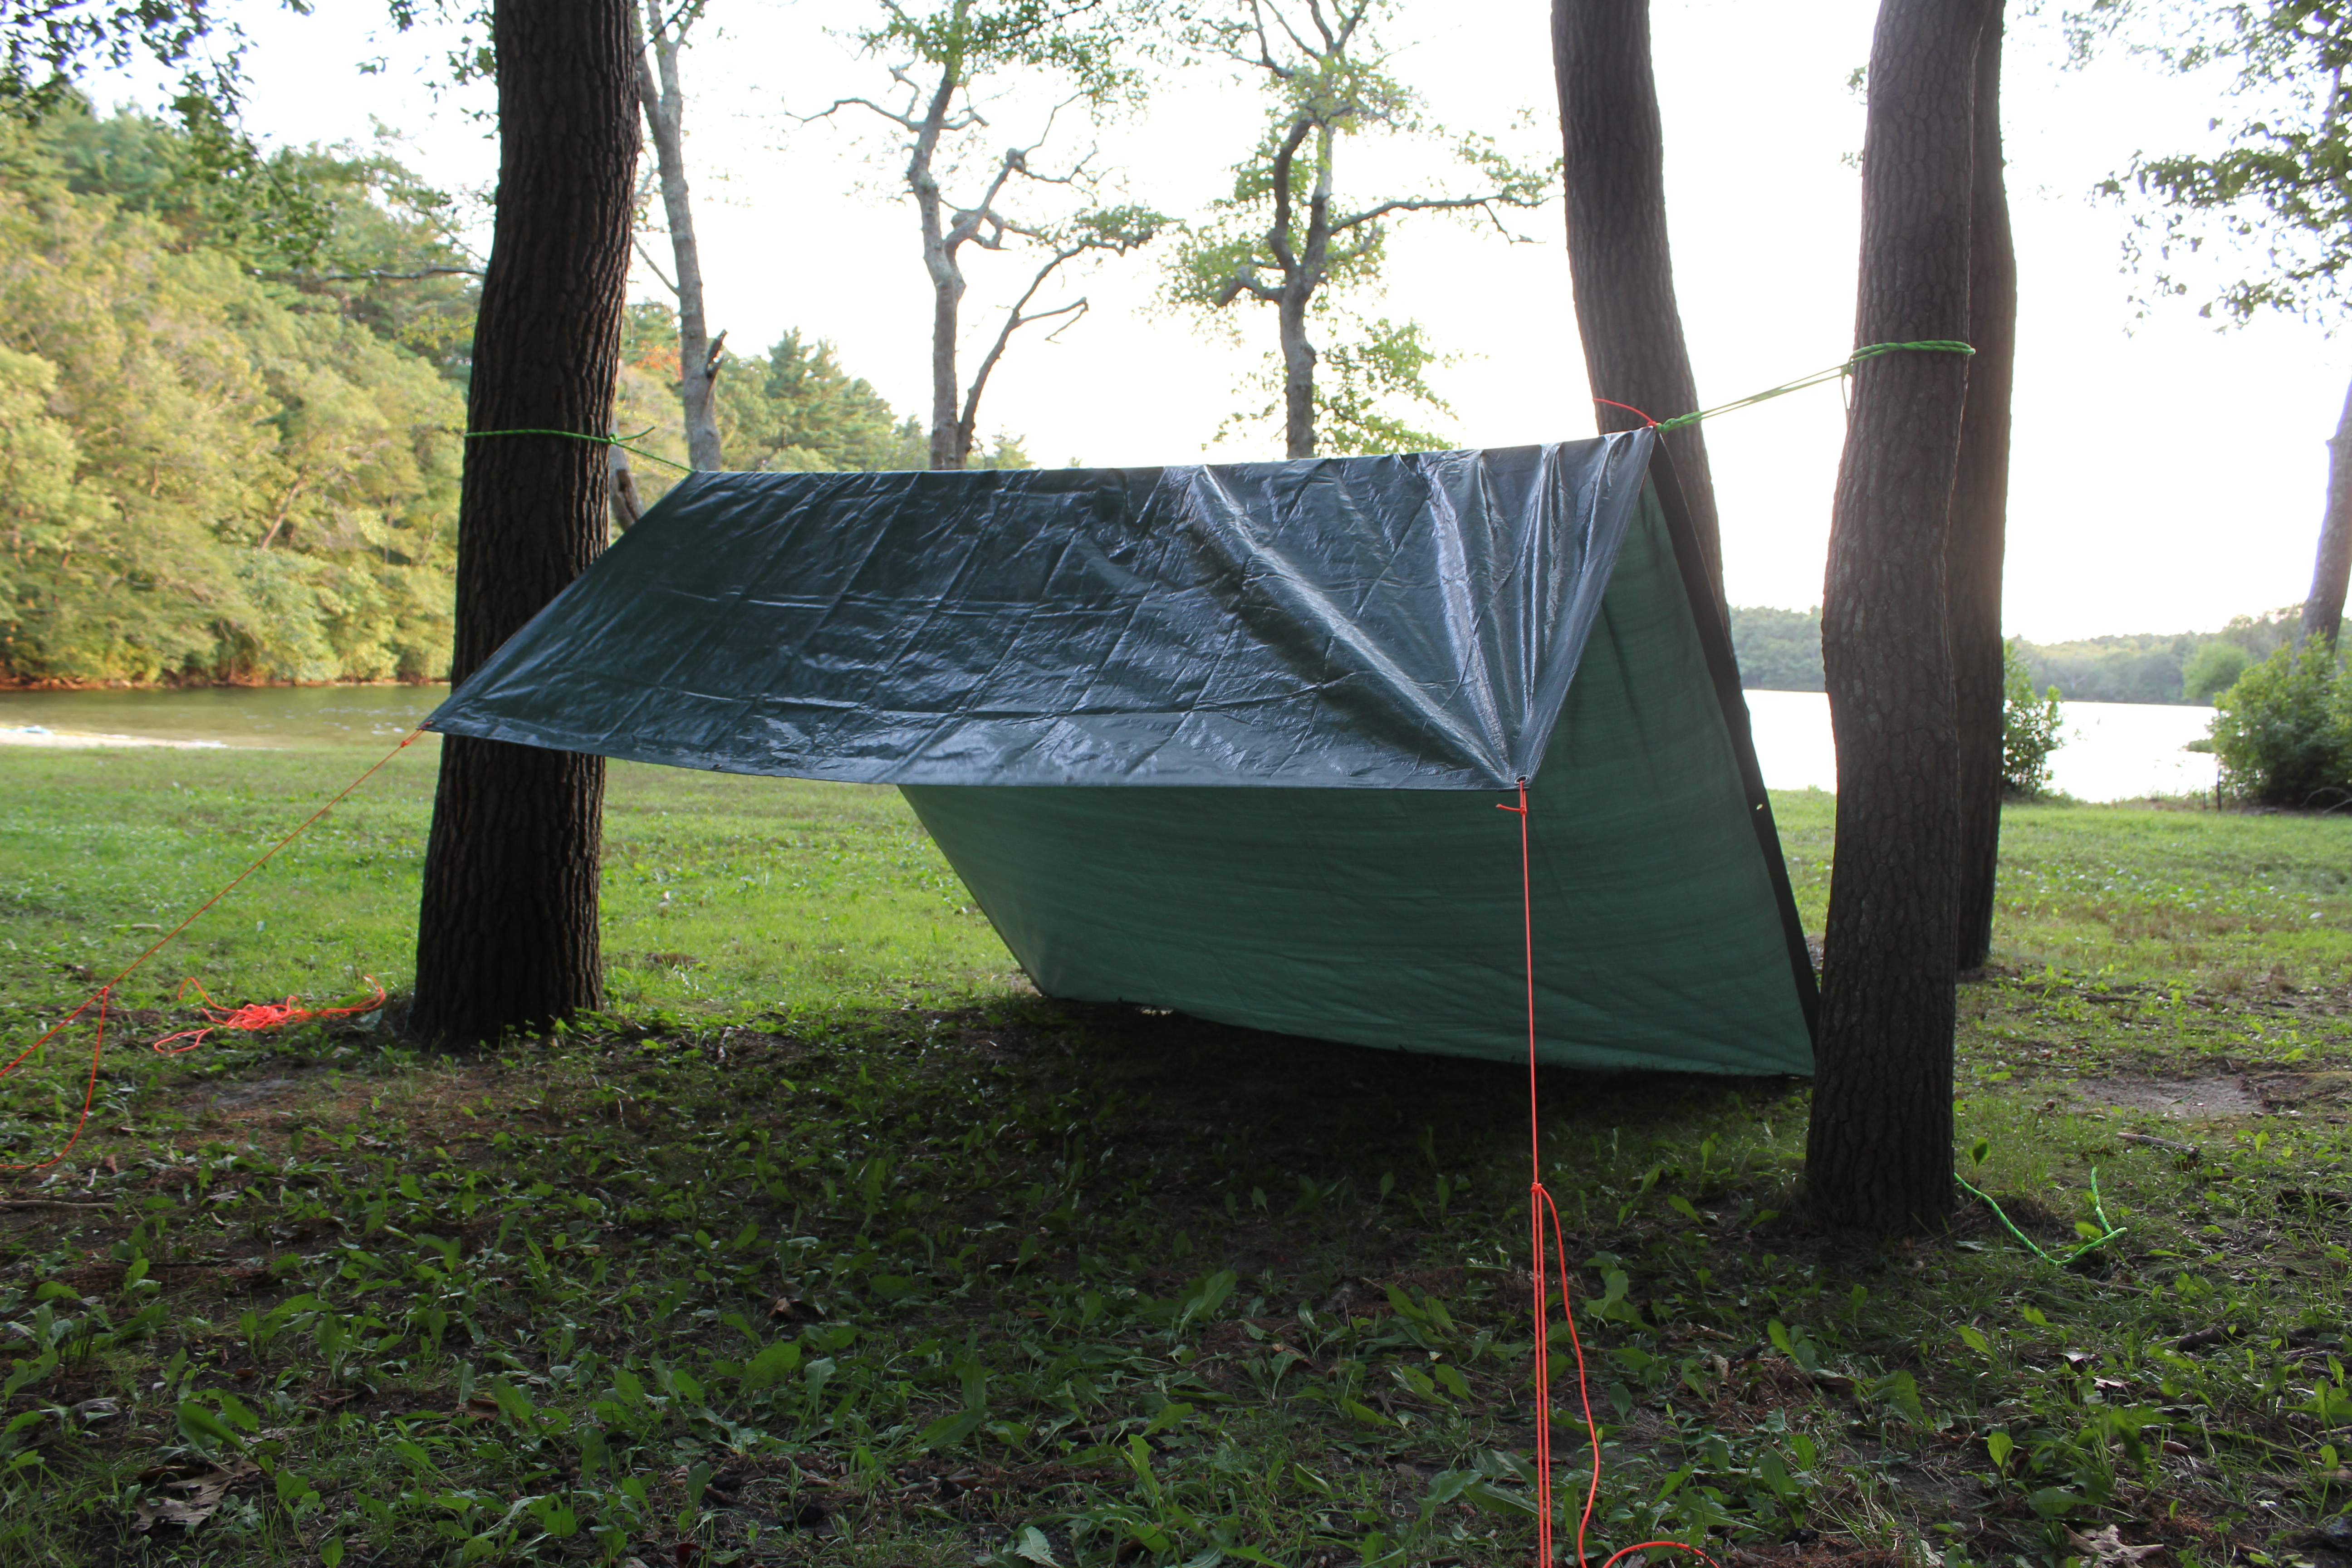
The A-frame configuration is a sturdy design that offers warmth and protection from the elements. The benefits of this design are well worth the additional time that it takes to set up, especially if poor weather (lots of rain) is in the forecast or you plan to stay a camp for a few days.

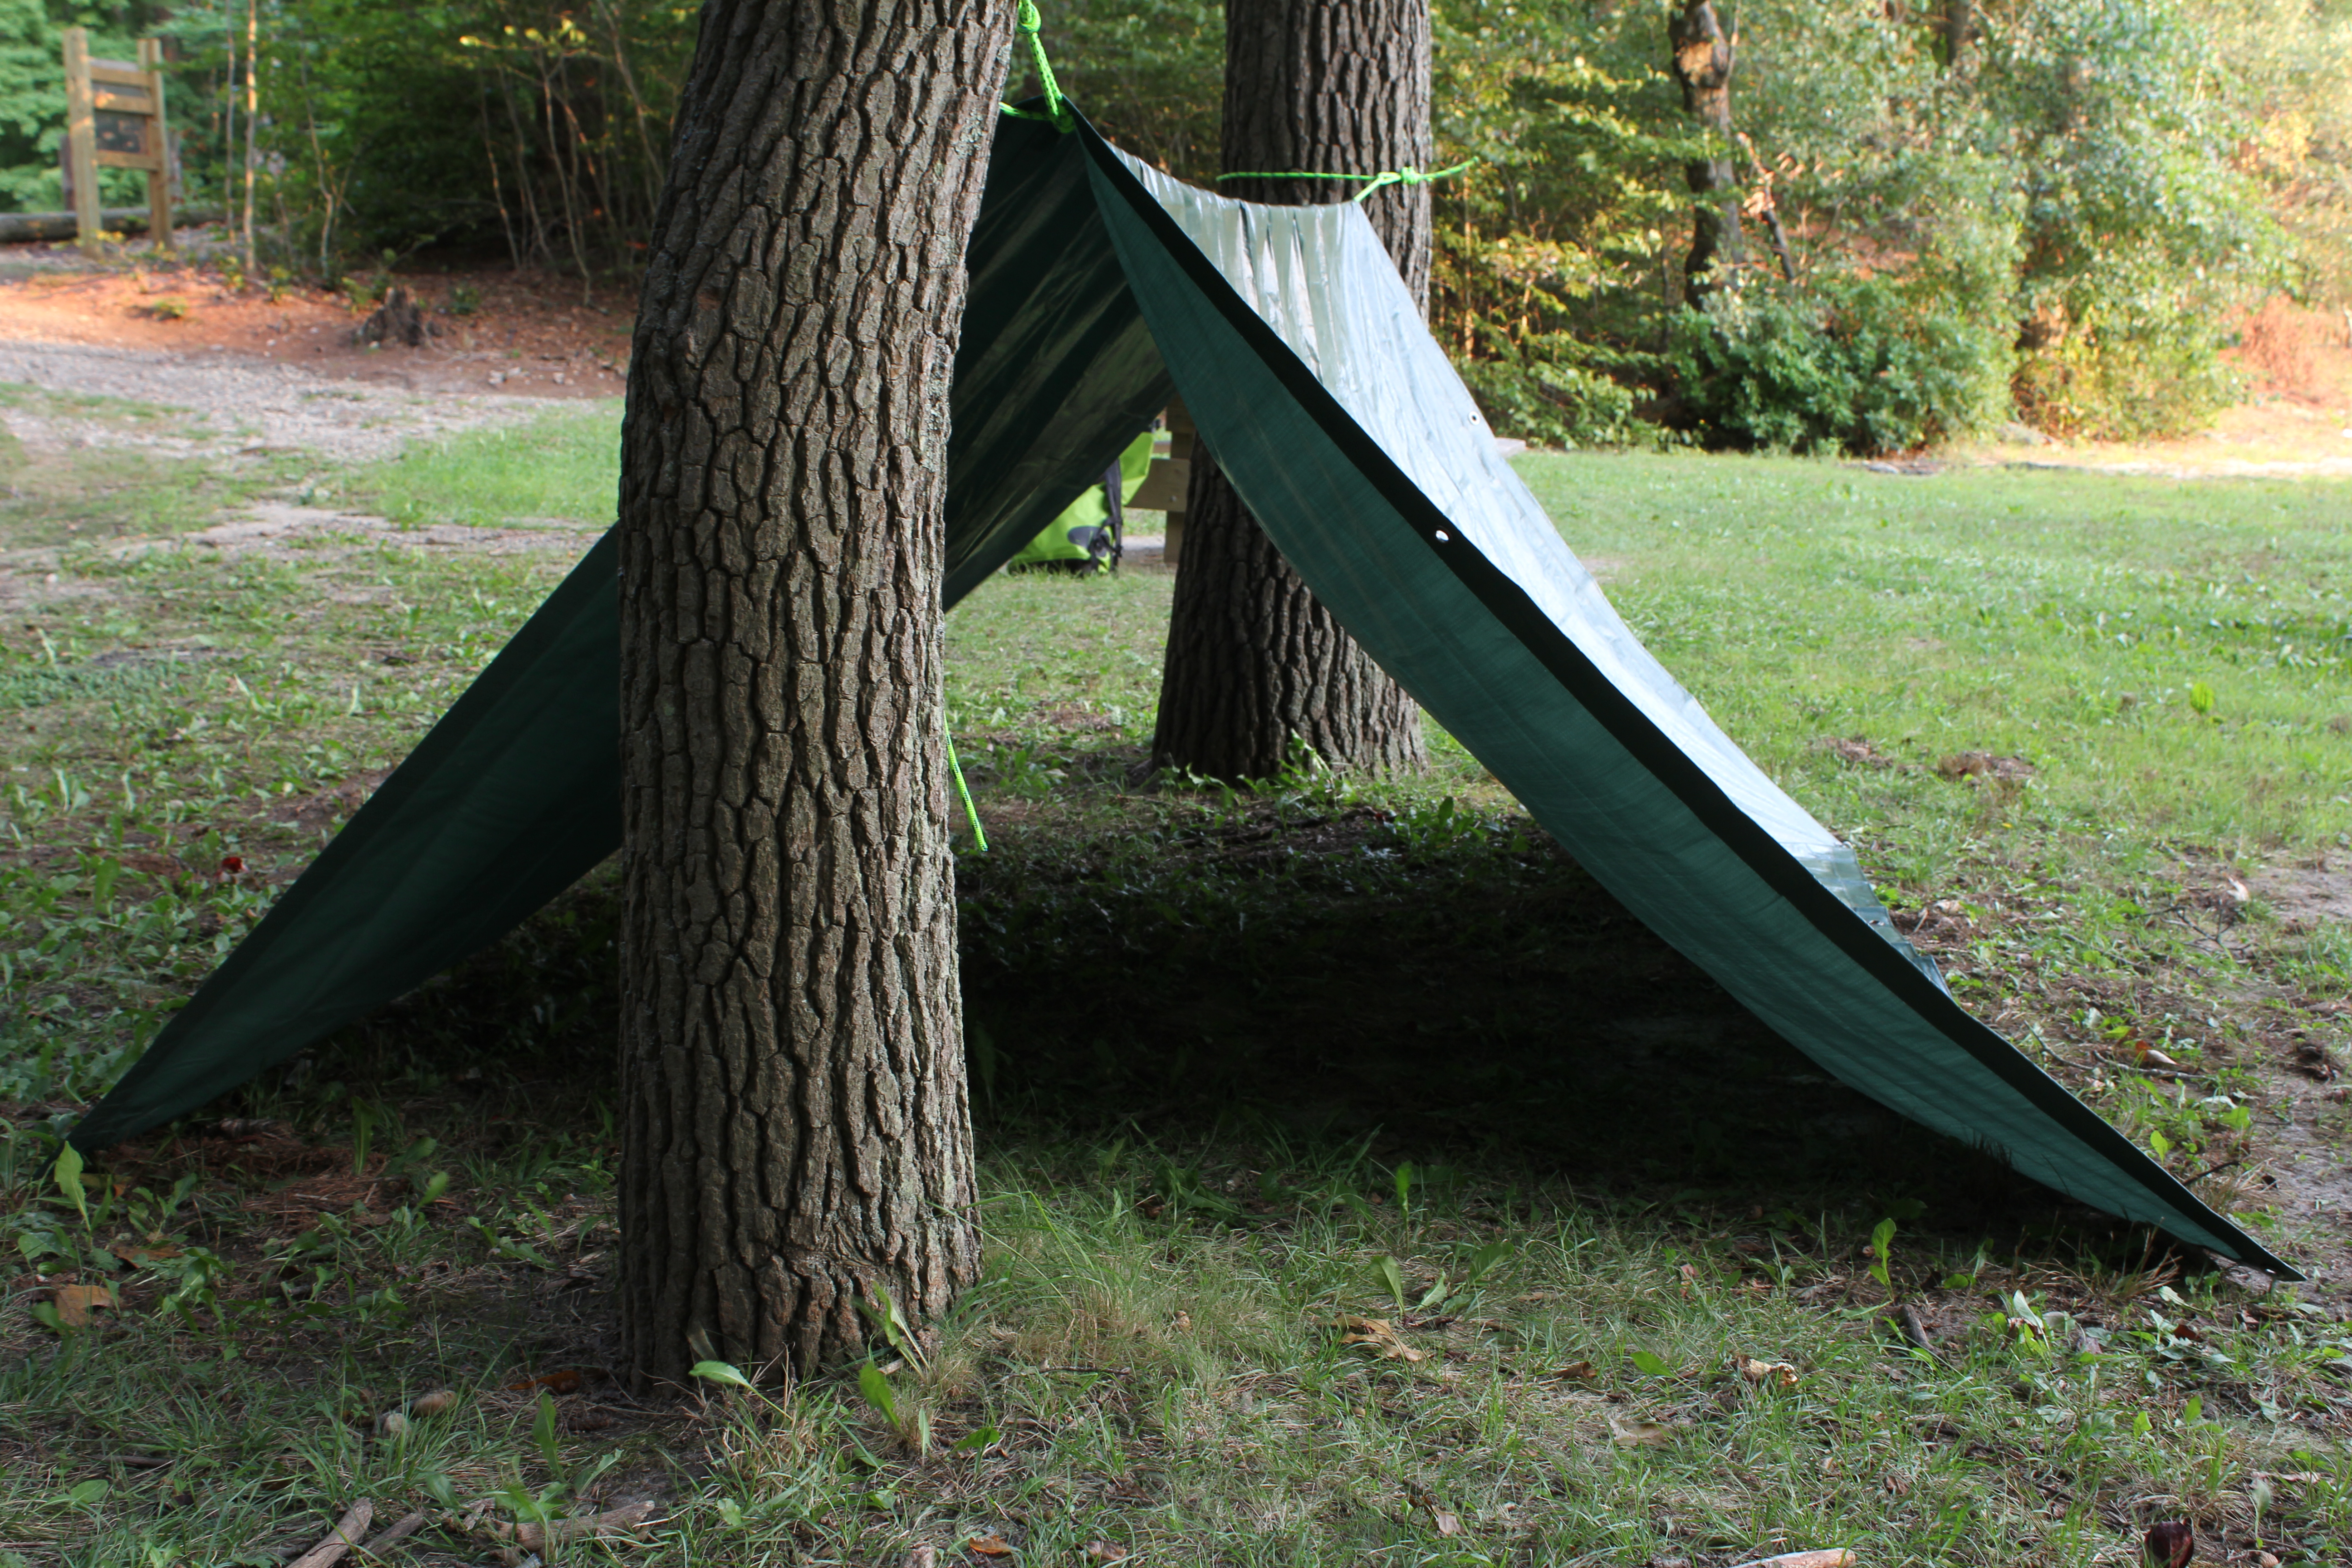
A-frame shelter using two trees

The easiest way to set up an A-frame tarp-tent is by pitching it between two sturdy trees that stand 12-15 feet apart. Start by stringing the rope between the two trees to create the ridge line. This can be accomplished by girth hitching one end of the rope about 4 feet up from the base of the first tree. From there, span the gap and tie a trucker’s hitch about 4 feet up from the base of the second tree. Pull the line taught and secure with a half-hitch. Next, lay the tarp over the ridge line such that the 8ft length is parallel to the line. Use short parachute cord ties (about 1ft long) to secure the center grommets to the ridge line. Finally, stake out the ends of the tarp to create the “A” shape.

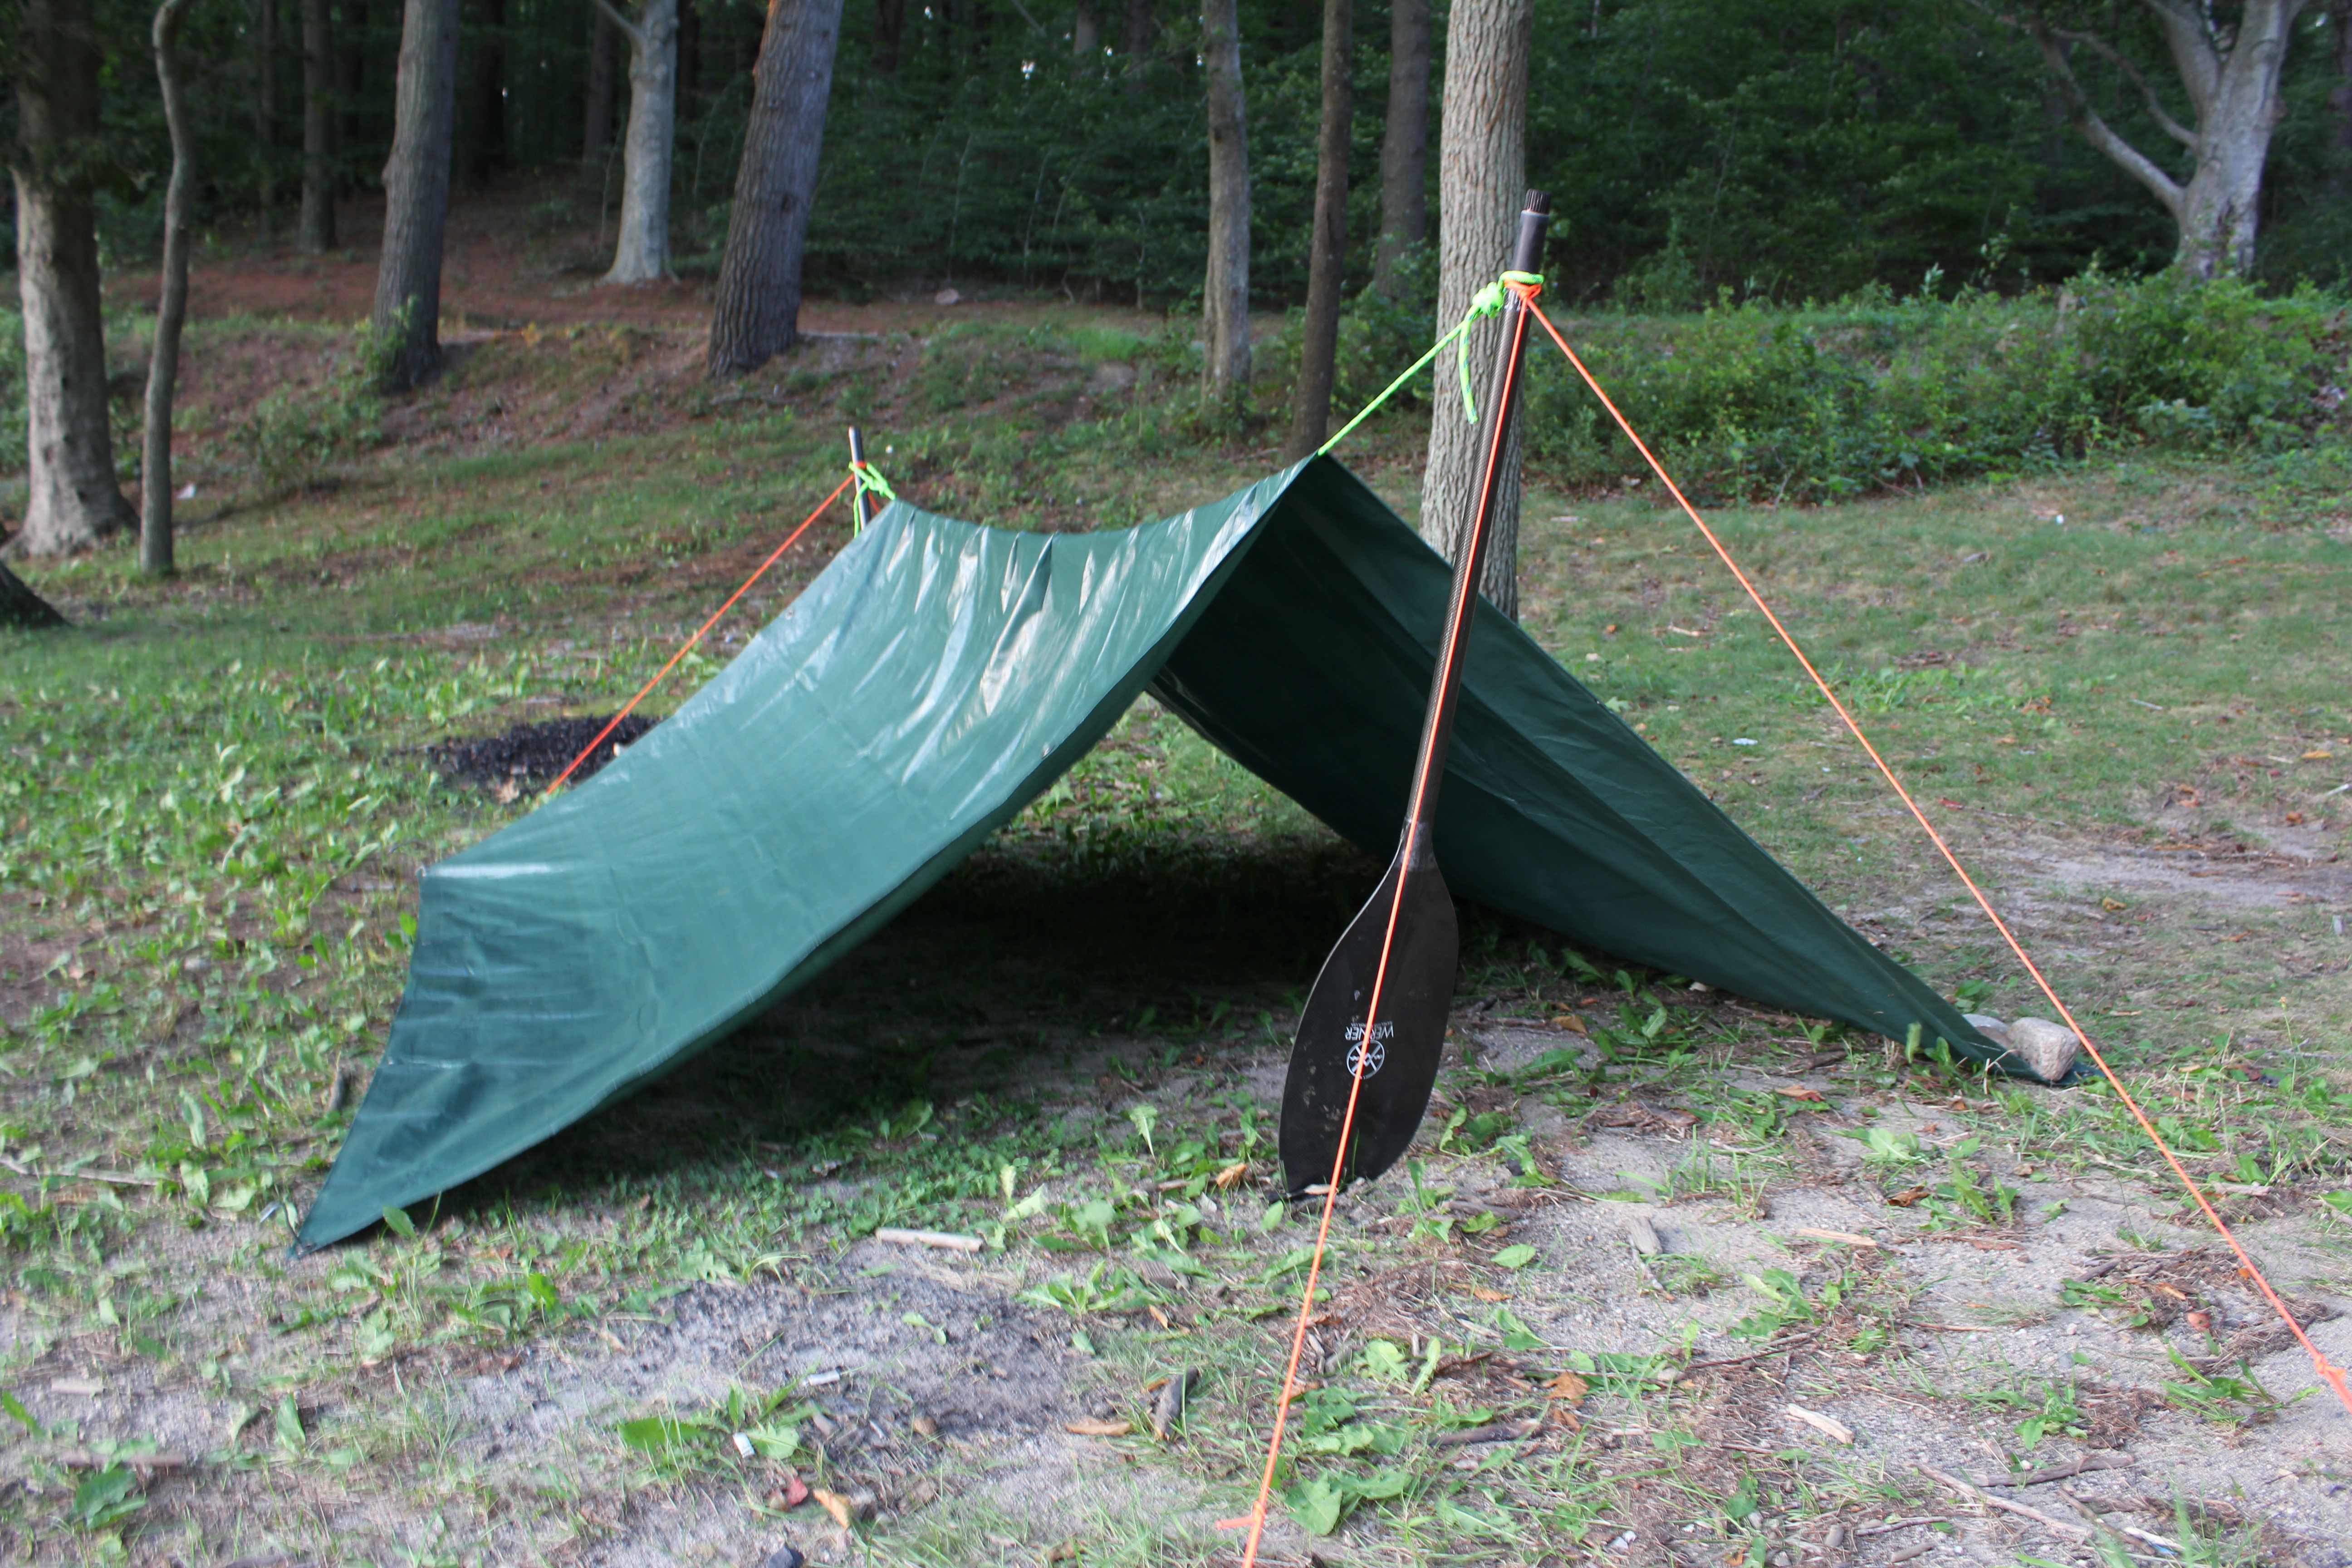
A-frame shelter using a kayak paddle for support

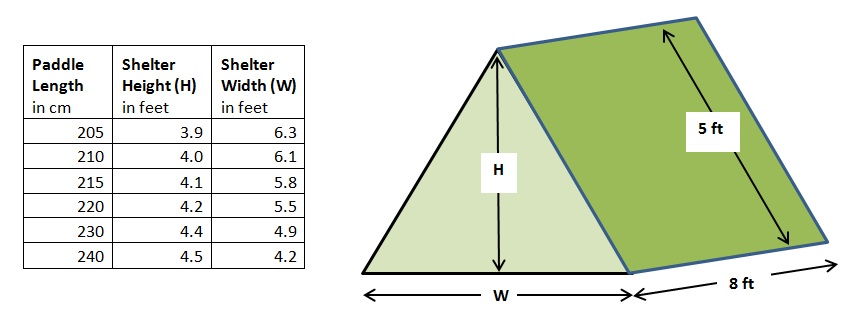
Don’t fret if there are no trees on your cast-away island; you have all that you need to make some poles in your trusty, two-piece paddle! Using paddles takes a bit longer to set-up as you’ll need to create two tripods to string the ridge-line between. A tripod consists of two stakes, a 10 foot-long piece of parachute cord, and half of a two-piece paddle. To build a tripod start by tying bowline knots into both ends of the 10 foot length of parachute cord. Next, stake the two ends of the parachute about 3-4 feet apart. Find the center of the parachute cord and wrap this around the ferrule on the paddle shaft. Lift the paddle-half to create tension and the desired tripod. Build a second tripod about 12 feet away. String the ridge-line between the apex of these two tripods and complete the A-frame as usual! Here’s a handy chart provides the dimensions of you’re a-frame based on the length of your paddle and assuming that you’re using an 8x10ft tarp:

The Lean-to:

The Lean-to configuration serves as an excellent alternative to the A-frame structure by offering a bit more head room and versatility. This structure provides protection from the wind on one side while leaving the opposite side open to your campsite. A campfire and reflector to be built a close (but safe) distance away from the open side such that the heat can be reflected back into the shelter to warm its occupants. The lean-to is best used when camping in descent weather or in cooler temperatures where the warmth of a fire may be necessary. It’s also useful as a day-time shelter from the sun.

Lean-to shelters provide an excellent wind break

Like the A-frame configuration, the Lean-to is most easily pitched between two sturdy trees that stand 12-15 feet apart. Start by stringing the rope between the two trees to create the ridge line about 5-6 feet off of the ground. Girth hitch one end of the rope to the first tree, span the gap between the trees, and tie a trucker’s hitch to the second tree. Pull the line taught and secure with a half-hitch. Next, lay the tarp over the ridge line such that the 8ft length is parallel to the line. About 2/3-3/4 of the tarp should fall on the side facing the wind to create the back of the shelter. Stake out the back wall of the shelter using rocks, sticks, or stakes. Now move to the front of the shelter to create an awning with the left over tarp. Tie 6ft lengths of parachute cord to the corner grommets and stake out to create a small awning on the front of the shelter. A taught-line hitch may be useful to tighten the guy-lines on the awning. Finally, use short parachute cord ties (about 1ft long) to secure the tarp to the ridge line to keep it from shifting.

Note: The ridge line may be lowered to provide more protection from inclement weather.

The Over-Kayak:

The “Over-Kayak” configuration is probably the simplest and fastest tarp shelter to construct. All you need is your kayak, a tarp, and a few rocks collected from the beach to build this bivy-like structure. The Over-Kayak shelter makes for some tight quarters but its low-profile is great for deflecting the wind and keeping you warm. It’s best reserved for emergency situations or a quick overnight when you don’t want to spend time building a more elaborate structure.

To construct the over-shelter, start by laying the tarp flat on the ground. Then place your kayak along one of the 8ft long sides of the tarp to hold it down. For maximum head room consider placing the kayak upside down or on edge. Pull the other end of the tarp over the kayak and secure the loose end to the ground with rocks or stakes. The shelter space can be adjusted by folding excess tarp under to serve as a “ground tarp”. Special consideration should be given to the wind direction such that the kayak serves as a wind block.

Tips and Tricks:

  • Utilize trees as your vertical supports if they’re available. It can be difficult to set up a tarp tent using paddles if you’re on your own or if it’s windy.
  • Consider the direction of the wind when pitching your tarp tent. Pitch the tarp tent such that the wind hits the walls and not the entrances.
  • Consider your site selection carefully. Avoid pitching your tarp tent in areas that may become flooded during a passing storm. Also, always inspect the tree canopy above your site for hanging limbs which may fall down in the wind.
  • Never store food in your tarp tent. Food will attract uninvited guests and there’s not much keeping them out of a tarp tent!
  • Consider bringing a second tarp to serve as a ground cloth.
  • Practice makes perfect. Spend some time building various tarp tents in your local park on a nice day so that you’re confident in your designs when you enter the back country.

Commercially Available Tarp Tents:

There are a number of tarp tents available on the market these days. Commercially available tarp tents are typically constructed of better materials that are more lightweight, durable, and waterproof than the standard $10 tarp. They also may have more lash-down points and may be cut into a more useful shape such as a hexagon. The obvious downside is that these shelters carry a price tag (>$100.00) that’s equivalent to most mid-grade, 3-season tents. Here are a few tarp tents that I’ve looked into along with links to some great reviews:

I hope that you enjoyed this post and will consider trying out a tarp tent on your next kayak camping adventure. Be sure to check back for many more kayak camping tips and gear reviews in future!

-Kayak Dave
Categories: Kayak Camping, Virtual Instruction | 2 Comments

Maine Open Lighthouse Day 2012

On September 15th, 2012 the American Lighthouse Foundation and the USCG will welcome visitors to twenty-three lighthouses along the Maine coast as part of the largest open lighthouse event in the country!  The goal of the fourth annual Maine Open Lighthouse Day is to increase awareness of Maine’s maritime, lighthouse, and lighthouse keeper history. Take guided or self-guided tours  of lighthouse grounds and towers up and down the Maine coast! Most sites will be open from 9:00am to 3:00pm.

For more information on this event visit: www.lighthouseday.com

-Kayak Dave

Categories: Announcements | Comments Off on Maine Open Lighthouse Day 2012